Configure GitHub Copilot in VS Code to work with Azure OpenAI/Azure AI Foundry
Original question: How configure GitHub Copilot in VS Code to work with Azure OpenAI/Azure AI Foundry
You can configure GitHub Copilot in VS Code to use models hosted on Azure OpenAI or Azure AI Foundry by adding a custom model entry to your VS Code settings.json file and then selecting that model in the Copilot Chat model picker. The key requirement is that you must use the Azure deployment name (not the model name) in the URL, and the URL must point to the chat completions endpoint. Currently, only models that use the chat completions API are supported; models using the responses API, such as GPT-5-Codex, will not work. Additionally, models with a temperature setting other than 1, like GPT-5-Mini and GPT-5, may produce a temperature error after the initial connection is established. This guide covers the exact configuration steps, required software versions, known limitations, and troubleshooting for common errors.
The Full Answer
Prerequisites and Required Versions
Before you begin, you need the correct versions of VS Code and the GitHub Copilot extensions. According to the accepted solution on Stack Overflow by Stavros Koureas, the following minimum versions are required:
- VS Code version 1.105.1 or later
- GitHub Copilot extension version 1.388.0 or later
- GitHub Copilot Chat extension version 0.32.4 or later
These version requirements exist because the ability to use custom Azure models was added in recent updates. If you are using an older version, the configuration options described here may not appear. To check your versions in VS Code, open the Extensions view (Ctrl+Shift+X), find the GitHub Copilot and GitHub Copilot Chat extensions, and look at the version number listed next to each extension name. You can update extensions from the same view by clicking the update button if one is available.
You also need an active GitHub Copilot subscription. The official GitHub Copilot documentation states that you can start with Copilot Free to explore limited features, or upgrade to Copilot Pro, Copilot Pro+, or Copilot Max for more features, models, and request limits. For this configuration, a Copilot Free or higher plan should work, but the custom Azure model feature may require a Copilot Pro or higher plan depending on your organization's policies. Check the GitHub Copilot plans page for the most current information.
You must also have an Azure OpenAI or Azure AI Foundry deployment with a model that supports chat completions. The deployment must have an associated endpoint URL and an API key. You will need both of these values during configuration.
Step-by-Step Configuration
Step 1: Open VS Code Settings.json
In VS Code, open the Command Palette by pressing Ctrl+Shift+P (Windows/Linux) or Cmd+Shift+P (Mac). Type "Preferences: Open User Settings (JSON)" and select it. This opens the settings.json file where you can add custom configuration. If you prefer a GUI approach, you can also go to File > Preferences > Settings, then click the "Open Settings (JSON)" icon in the top right corner of the Settings tab.
Step 2: Add the Azure Model Configuration
In the settings.json file, add a new entry under the github.copilot.chat.azureModels key. The structure is a JSON object where each key is a model identifier (you can choose any name) and the value is an object with the model's configuration. Here is the exact configuration from the Stack Overflow question, with placeholders you need to replace:
"github.copilot.chat.azureModels": {
    "gpt-5-mini": {
        "name": "gpt-5-mini",
        "url": "https://xxx.openai.azure.com/openai/deployments/gpt-5-mini/chat/completions?api-version=2025-04-01-preview",
        "toolCalling": true,
        "vision": true,
        "thinking": true,
        "maxInputTokens": 272000,
        "maxOutputTokens": 128000,
    }
}
Replace the following values with your own:
"gpt-5-mini"(the key): This is an identifier you choose. It does not have to match the model name. Use something descriptive like"my-azure-model"."name": This is the display name that will appear in the Copilot model picker. You can set it to anything, but using the deployment name is recommended for clarity."url": This is the most critical part. The URL must follow this pattern:
https://<your-resource-name>.openai.azure.com/openai/deployments/<your-deployment-name>/chat/completions?api-version=<api-version>
Replace <your-resource-name> with the name of your Azure OpenAI resource (the part before .openai.azure.com). Replace <your-deployment-name> with the deployment name you gave the model in Azure AI Foundry or Azure OpenAI Studio. This is NOT the model name (e.g., "gpt-5-mini") but the deployment name you assigned when you created the deployment. The accepted answer on Stack Overflow explicitly states: "your configuration is using the model name and not the deployment name, try using the deployment name you gave into Azure Foundry." The api-version parameter should match a supported API version for your model. The example uses 2025-04-01-preview, but you should use the version that your deployment supports. You can find the supported versions in the Azure OpenAI documentation or by checking the deployment's properties in Azure AI Foundry.
"toolCalling","vision","thinking": These are boolean flags that enable specific capabilities. Set them totrueorfalsebased on what your model supports. Most Azure OpenAI models support tool calling and vision, but thinking (reasoning) is only available on certain models like o1 or o3. If you set a capability totruethat the model does not support, you may get errors or unexpected behavior. When in doubt, set them tofalseand test."maxInputTokens"and"maxOutputTokens": These set token limits. The values in the example (272000 input, 128000 output) are very high and may exceed your model's actual limits. Check your model's documentation for the correct maximum token counts. Setting these too high may cause errors; setting them too low may truncate responses.
Step 3: Save settings.json and Reload VS Code
After adding the configuration, save the file (Ctrl+S). It is a good practice to reload the VS Code window to ensure the new settings are picked up. You can do this by opening the Command Palette and running "Developer: Reload Window" or by closing and reopening VS Code.
Step 4: Select the Azure Model in Copilot Chat
Open the GitHub Copilot Chat view. You can do this by clicking the Copilot Chat icon in the VS Code title bar (it looks like a chat bubble with a small sparkle) or by using the keyboard shortcut Ctrl+Alt+i (Windows/Linux) or Control+Command+i (Mac).
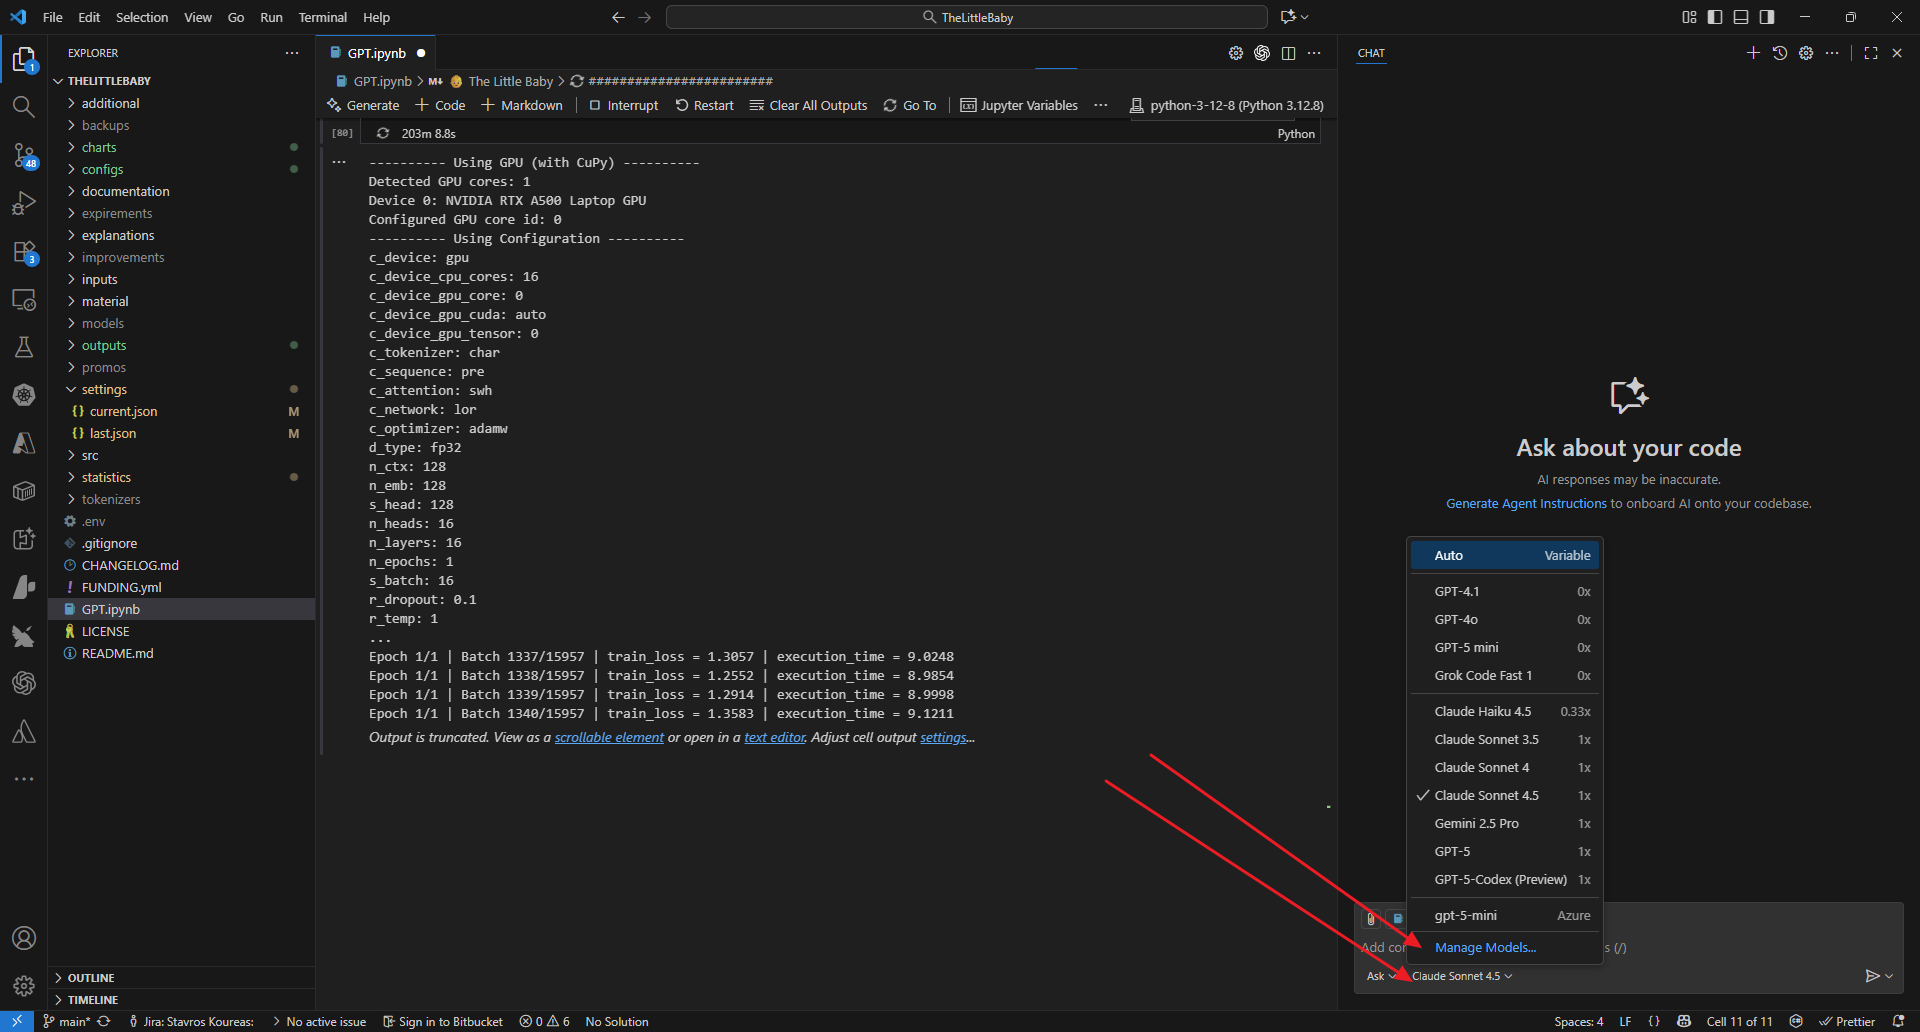
In the Copilot Chat view, look for a model selector. The exact location may vary by version, but it is typically a dropdown or a button that shows the current model name (e.g., "GPT-4o"). Click on it to open the model picker. According to the accepted answer, you should see an option to "Manage Models" or a similar entry. Click that, then select "Azure" from the list of providers. A dialog will appear asking for your API key.
Enter the API key for your Azure OpenAI deployment. You can find this key in the Azure portal under your OpenAI resource's "Keys and Endpoint" section. Copy one of the two keys (Key 1 or Key 2) and paste it into the dialog. Click the blue OK button to confirm.
After entering the API key, the model you configured should appear in the model list. Make sure the checkbox next to it is enabled (checked). Then click the blue OK button again to apply the selection. The model should now be selected in the Copilot Chat view, and you can start using it.
Step 5: Test the Configuration
Send a simple coding-related question to Copilot Chat, such as "Write a function to calculate the factorial of a number in Python." If the configuration is correct, you should receive a response generated by your Azure OpenAI model. If you see an error, proceed to the troubleshooting section below.
Alternative URL Formats
The Stack Overflow question mentions that some blog posts suggest different URL formats. Specifically, some sources recommend using the Target URL from the deployment pane of Azure AI Foundry, which looks like:
https://xxx.openai.azure.com/openai/responses?api-version=2025-04-01-preview
This URL uses the responses API endpoint, not the chat completions endpoint. The accepted answer explicitly states that "models under responses api are not supported like GPT-5-Codex." Therefore, you must use the chat completions endpoint format:
https://<resource>.openai.azure.com/openai/deployments/<deployment-name>/chat/completions?api-version=<version>
If you are unsure which URL to use, always prefer the chat completions format. The responses API is a newer, different API that is not compatible with GitHub Copilot's current integration.
Understanding the Configuration Fields
The github.copilot.chat.azureModels setting accepts an object where each key is a model identifier. The value object can contain the following fields, based on the source material:
name(string): A human-readable name for the model, shown in the UI.url(string): The full endpoint URL for the Azure OpenAI chat completions API.toolCalling(boolean): Whether the model supports function/tool calling. Set totrueif your model supports it.vision(boolean): Whether the model supports image inputs. Set totrueif your model is multimodal.thinking(boolean): Whether the model supports reasoning or thinking capabilities. Only available on certain models.maxInputTokens(integer): The maximum number of tokens the model can accept in a single request.maxOutputTokens(integer): The maximum number of tokens the model can generate in a single response.
Not all fields are required. The source material does not specify which fields are mandatory, but based on the example, name and url are essential. The other fields are optional and can be omitted if you are unsure. If omitted, Copilot will use default values, which may or may not work depending on the model.
How to Find Your Deployment Name
If you are unsure what your deployment name is, follow these steps:
- Go to the Azure portal (portal.azure.com).
- Navigate to your Azure OpenAI resource.
- Under "Resource Management," click on "Model Deployments" or "Deployments." This will take you to Azure AI Foundry (or Azure OpenAI Studio).
- In the Deployments page, you will see a list of your deployments. Each deployment has a "Deployment name" column. That is the name you need to use in the URL.
Do not confuse the deployment name with the model name. For example, you might have a deployment named "my-gpt4-deployment" that uses the "gpt-4" model. In the URL, you would use "my-gpt4-deployment" as the deployment name, not "gpt-4".
Known Limitations and Workarounds
Responses API Not Supported
As mentioned, models deployed with the responses API (e.g., GPT-5-Codex) are not supported. The accepted answer states that when you try to select such a model, "the popup will not open to put the api key." If you encounter this, you must redeploy the model using the chat completions API. In Azure AI Foundry, when creating a new deployment, ensure you select a model that supports chat completions. Most GPT-4 and GPT-3.5 models do. Newer models like GPT-5-Codex may only support the responses API.
Temperature Error with GPT-5-Mini and GPT-5
The accepted answer warns that models with a temperature setting different from 1 are not supported. Specifically, GPT-5-Mini and GPT-5 may produce a temperature error after the initial connection is established. The error message is not provided in the source, but it likely indicates that the model's temperature parameter cannot be set to the value Copilot is sending. This is a known limitation that the answer author has proposed a fix for (see the pull request at https://github.com/microsoft/vscode-copilot-chat/pull/1763). Until that fix is accepted and released, you may not be able to use GPT-5-Mini or GPT-5 with this configuration. If you need to use these models, you may need to wait for an update or use a different model.
Resource Not Found Error
The most common error is "Resource not found" with a request ID. This error typically occurs for one of three reasons:
- The URL is incorrect. Double-check that you are using the chat completions endpoint and that the deployment name is correct.
- The API key is missing or incorrect. Ensure you have entered the API key correctly in the model selection dialog.
- The model deployment does not exist or is not accessible. Verify that the deployment is active and that your Azure subscription has not expired.
"Sorry, your request failed. Please try again." Error
This generic error can have many causes. The Stack Overflow question reports this error with a request ID. The accepted answer suggests that the root cause is likely the URL or deployment name issue. However, the question also references two GitHub issues that may indicate bugs in the VS Code Copilot extension:
- https://github.com/microsoft/vscode-copilot-release/issues/8483
- https://github.com/microsoft/vscode-copilot-release/issues/8012
If you have verified your configuration and still get this error, check these GitHub issues to see if they describe your problem. They may contain workarounds or confirmation that a fix is in progress.
Best Practices for Using Copilot with Azure Models
Once your configuration is working, follow these best practices from the official GitHub Copilot documentation to get the most out of the tool:
- Understand Copilot's strengths and weaknesses. Copilot excels at writing tests, debugging syntax, explaining code, and generating regular expressions. It is not designed to replace your expertise. Always review the generated code.
- Choose the right tool for the job. Inline suggestions are best for completing code snippets and generating repetitive code. Copilot Chat is better for answering questions, generating large code sections, and iterating on code.
- Create thoughtful prompts. Break down complex tasks, be specific about requirements, provide examples, and follow good coding practices. The official documentation has a separate guide on prompt engineering for GitHub Copilot Chat.
- Check Copilot's work. Understand suggested code before implementing it. Review for functionality, security, readability, and maintainability. Use automated tests, linting, and code scanning to catch issues.
- Guide Copilot towards helpful outputs. Open relevant files and close irrelevant files in your IDE. In Copilot Chat, delete unhelpful requests from the conversation or start a new conversation. Rewrite prompts if responses are not helpful.
- Stay up-to-date. New features are regularly added to Copilot. Check the changelog periodically.
Community-Reported Issues and Workarounds
The Stack Overflow community has reported several issues beyond the official documentation:
- Some users have found that the model picker does not show the Azure option at all. This is often due to an outdated VS Code or Copilot extension version. Updating to the versions listed in the prerequisites usually resolves this.
- The API key dialog may not appear for some users. In that case, try restarting VS Code after adding the configuration. If the dialog still does not appear, check that the URL is correct and that the model is not using the responses API.
- The temperature error for GPT-5-Mini and GPT-5 is a known limitation that the community is tracking. The accepted answer includes a link to a pull request that proposes a fix. You can vote for that pull request to increase its priority.
- Some users have reported that the
maxInputTokensandmaxOutputTokensvalues are ignored or cause errors. If you encounter issues, try removing these fields from the configuration and see if the model works with default values.
Troubleshooting Checklist
If you are still having trouble, go through this checklist:
- Verify VS Code and extension versions meet the minimum requirements.
- Confirm you have an active GitHub Copilot subscription.
- Ensure your Azure OpenAI deployment exists and is active.
- Copy the exact URL from the deployment's chat completions endpoint, not the responses endpoint.
- Replace the deployment name in the URL with the exact deployment name from Azure AI Foundry.
- Add the configuration to settings.json and save.
- Reload VS Code.
- Open Copilot Chat and select the Azure model from the model picker.
- Enter the API key when prompted.
- Send a test message.
If the error persists, check the GitHub issues referenced in the Stack Overflow question for known bugs. If the issue is not listed, consider posting a new question on Stack Overflow or opening an issue on the vscode-copilot-release repository.
Common Pitfalls
Using the Model Name Instead of the Deployment Name
This is the most common mistake. The URL must contain the deployment name, not the model name. For example, if you deployed "gpt-4" with the deployment name "my-gpt4", the URL should use "my-gpt4", not "gpt-4". The accepted answer explicitly calls this out as the likely cause of the "Resource not found" error.
Using the Responses API Endpoint
Azure AI Foundry provides a "Target URL" in the deployment pane that may point to the responses API. Do not use this URL. GitHub Copilot only supports the chat completions API. The responses API endpoint looks like:
https://xxx.openai.azure.com/openai/responses?api-version=2025-04-01-preview
This will not work. Always use the chat completions endpoint format.
Incorrect API Version
The API version in the URL must be supported by your deployment. Using an unsupported version will result in an error. Check your deployment's documentation for the correct API version. The example uses 2025-04-01-preview, but you may need to use a different version, such as 2024-10-01-preview or 2024-02-15-preview. If you are unsure, start with the latest stable version listed in the Azure OpenAI documentation.
Missing or Incorrect API Key
If the API key is missing or incorrect, Copilot will not be able to authenticate with Azure. When you enter the API key in the dialog, make sure you copy the entire key without extra spaces. The key is a long alphanumeric string. If you are unsure, regenerate a new key from the Azure portal and try again.
Model Does Not Support Chat Completions
Some models, especially newer ones like GPT-5-Codex, only support the responses API. These models cannot be used with GitHub Copilot. If you need to use such a model, you must wait for Microsoft to add support for the responses API, or use a different model that supports chat completions.
Temperature Setting Conflict
Models like GPT-5-Mini and GPT-5 have a fixed temperature of 1 and cannot be changed. GitHub Copilot may attempt to set a different temperature, causing an error. This is a known limitation that the community is working to resolve. Until a fix is released, avoid using these models with Copilot.
Extension Version Mismatch
Using an older version of the GitHub Copilot or GitHub Copilot Chat extension may cause the Azure model option to not appear at all. Always update to the latest versions before troubleshooting further.
Related Questions
Can I use multiple Azure models with GitHub Copilot?
Yes, you can configure multiple models by adding multiple entries under the github.copilot.chat.azureModels setting in your settings.json. Each entry should have a unique key and its own URL, name, and capabilities. For example, you could have one entry for a GPT-4 model and another for a GPT-3.5 model. In the Copilot Chat model picker, you will see all configured models and can switch between them. Each model will require its own API key, which you will be prompted to enter when you first select it.
What should I do if the Azure model option does not appear in the Copilot Chat model picker?
First, ensure you have added the configuration to settings.json and saved the file. Then reload the VS Code window. If the option still does not appear, check that your VS Code and extension versions meet the minimum requirements (VS Code 1.105.1, Copilot 1.388.0, Copilot Chat 0.32.4). If they are outdated, update them and try again. If the option still does not appear, there may be a bug in the extension. Check the GitHub issues referenced in the Stack Overflow question for known problems. As a last resort, try disabling and re-enabling the GitHub Copilot Chat extension.
Can I use GitHub Copilot with Azure OpenAI without a GitHub Copilot subscription?
No, a GitHub Copilot subscription is required. The custom Azure model feature is an extension of GitHub Copilot, not a standalone service. You must have an active Copilot subscription (Free, Pro, or higher) to use Copilot Chat in VS Code, even if you are using your own Azure OpenAI model. The Azure model replaces the default model that Copilot uses, but the Copilot service itself is still required for the integration to work.
Is it possible to use Azure AI Foundry models with GitHub Copilot in other IDEs like JetBrains or Visual Studio?
The official GitHub Copilot documentation covers using Copilot in JetBrains IDEs, Visual Studio, and Xcode, but it does not mention support for custom Azure models in those environments. The configuration described in this guide is specific to VS Code. The github.copilot.chat.azureModels setting is a VS Code-specific setting. Other IDEs may have different configuration mechanisms or may not support custom models at all. Check the documentation for your specific IDE to see if custom model support is available.
The #1 Copilot Newsletter
The most important copilot updates, guides, and fixes — one weekly email.
No spam, unsubscribe anytime. Privacy policy
Sources & References
This page was researched from 4 independent sources, combined and verified for completeness.
- 1.GitHub Copilot Documentation — QuickstartOfficial documentation · primary source
- 2.GitHub Copilot Documentation — Best Practices For Using Github CopilotOfficial documentation
- 3.
- 4.Answer by Stavros Koureas (score 0, accepted)Stack Overflow
Related Answers
Keep exploring Copilot
Copilot resources
Latest error solutions
Latest tutorials
Skip the manual work
Ready-made AI workflows and automation templates — import and run instead of building from scratch.