
Back to Guides getting-started
 features
 features
 features
 features
GitHub Copilot Setup in VS Code, JetBrains, and Neovim: A Complete Guide
Neura Market Research July 19, 2026
0 views
Learn how to set up GitHub Copilot in VS Code, JetBrains IDEs, and Neovim. This guide covers installation, authentication, inline suggestions, Copilot Chat, best practices, and advanced configuration with custom instructions for code review.
This guide covers everything you need to know to get GitHub Copilot running in Visual Studio Code, JetBrains IDEs, and Neovim. It walks through prerequisites, installation, authentication, inline suggestions, Copilot Chat, and advanced configuration including custom instructions for code review. By the end, you will be able to set up Copilot in your preferred editor, write effective prompts, and tune its behavior to match your project's standards.
What You Need
Before you start, you must have the following:
- A personal GitHub account with access to a Copilot plan. You can start with Copilot Free to explore limited features without subscribing to a plan. You can upgrade to Copilot Pro, Copilot Pro+, or Copilot Max to unlock more features, models, and request limits. Note that starting April 22, 2026, new self-serve sign-ups for Copilot Business for organizations on GitHub Free and GitHub Team plans are temporarily paused.
- An active Copilot subscription for the editor you plan to use. This is a per-seat subscription tied to your GitHub account.
- A compatible editor with the latest version installed. For VS Code, use the latest version from the Visual Studio Code download page. For JetBrains, use a compatible IDE (IntelliJ IDEA, PyCharm, WebStorm, GoLand, RubyMine, CLion, PhpStorm, Rider, DataGrip, Android Studio, or Fleet). For Neovim, you need Neovim 0.9.0 or later.
- The GitHub Copilot extension installed in your editor. For VS Code, install the GitHub Copilot Chat extension. For JetBrains, install the GitHub Copilot plugin from the JetBrains Marketplace. For Neovim, install the copilot.lua plugin via a plugin manager.
- Sign in to GitHub in your editor. You must authenticate your GitHub account to enable Copilot. If you experience authentication issues, see the troubleshooting section.
Understanding Copilot's Two Main Tools
GitHub Copilot provides two primary ways to interact with it: inline suggestions and Copilot Chat. They serve different purposes and work best in different situations.
Inline Suggestions
Inline suggestions appear as grayed-out text directly in your editor as you type. They are best for:
- Completing code snippets, variable names, and functions as you write them.
- Generating repetitive code like boilerplate, getters, setters, and configuration files.
- Generating code from inline comments written in natural language. For example, writing
// function to calculate days between two dateswill trigger a suggestion. - Generating tests for test-driven development.
Copilot Chat
Copilot Chat is a conversational interface that lets you ask questions in natural language. It is best for:
- Answering questions about code in natural language, such as "what does this file do?" or "explain this line."
- Generating large sections of code, then iterating on that code to meet your needs.
- Accomplishing specific tasks with built-in keywords and skills. For example, you can tell Copilot Chat that it is a Senior C++ Developer who cares greatly about code quality, readability, and efficiency, then ask it to review your code.
- Asking general questions about software development, exploratory questions about a repository, finding out about changes in a pull request, or asking about a specific issue or commit.
Setting Up Copilot in Visual Studio Code
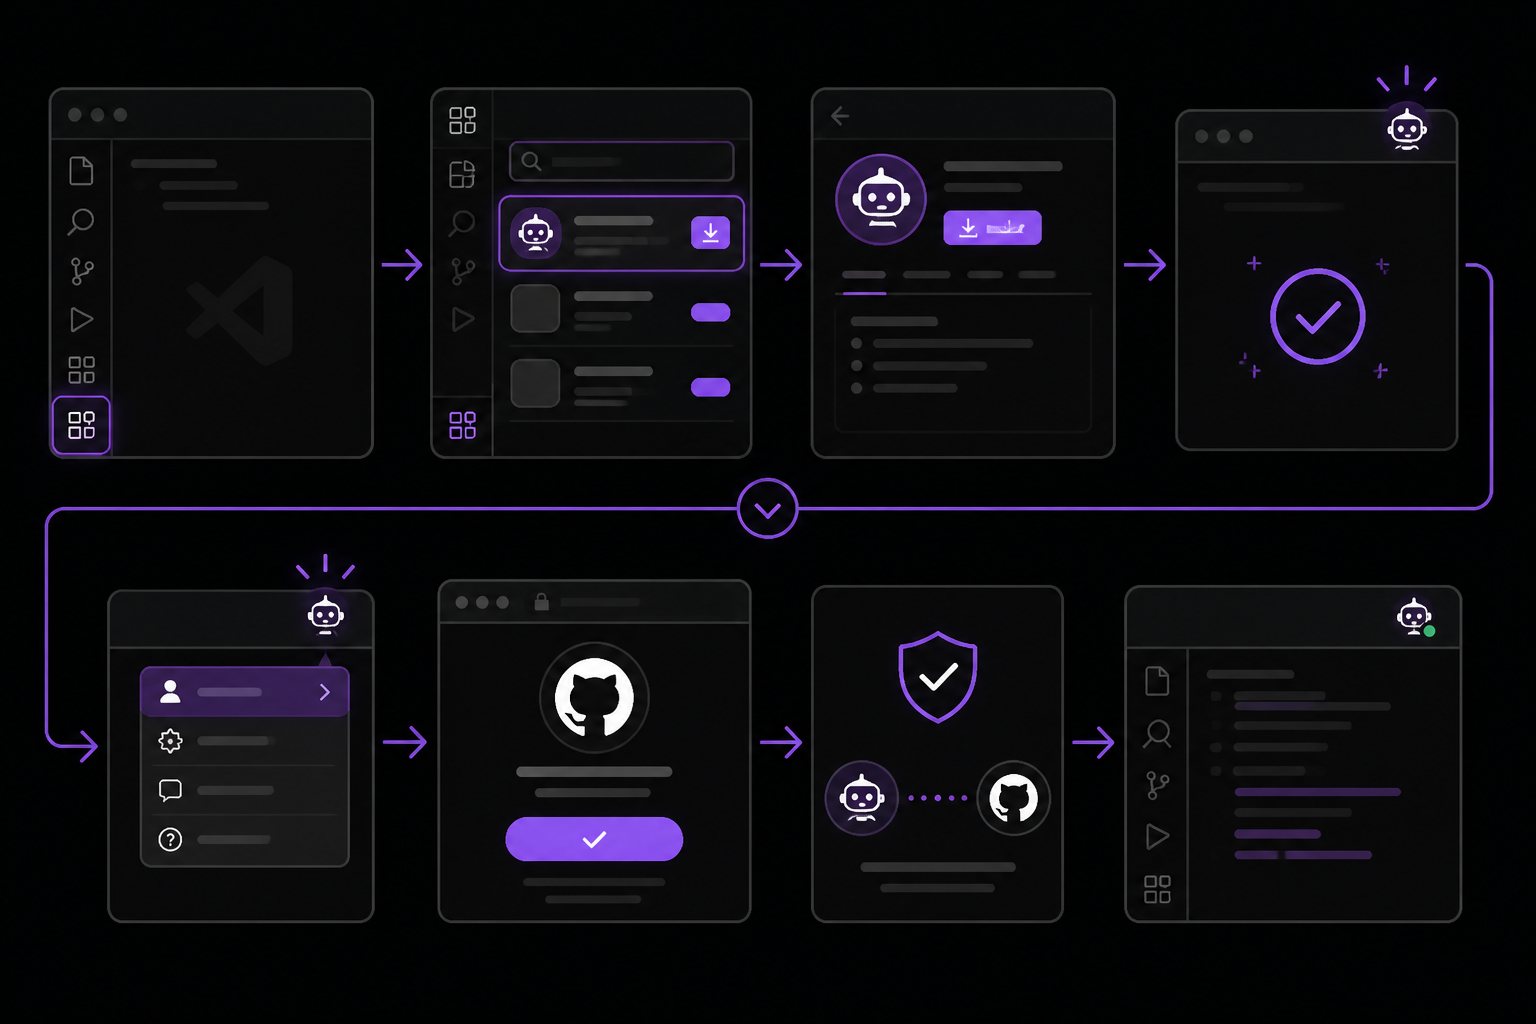
Installation
- Open VS Code.
- Go to the Extensions view by clicking the Extensions icon in the Activity Bar or pressing Ctrl+Shift+X.
- Search for "GitHub Copilot Chat" and install the extension. This extension includes both Copilot Chat and inline suggestions.
- After installation, you will see the Copilot icon in the title bar.
Authentication
- Click the Copilot icon in the title bar.
- Select "Sign in to GitHub."
- A browser window will open asking you to authorize VS Code. Follow the prompts to complete authentication.
- Once authenticated, the Copilot icon will show a checkmark, indicating you are signed in.
Using Inline Suggestions
- Create a new file with a supported language extension, such as
.jsfor JavaScript. - Type a function header, for example:
function calculateDaysBetweenDates(begin, end) {
- Copilot will automatically suggest an entire function body in grayed text. The exact suggestion may vary.
- To accept the suggestion, press Tab.
- To see alternative suggestions, press Ctrl+Enter (Windows/Linux) or Cmd+Enter (Mac). A list of up to 10 suggestions will appear. Use the arrow keys to browse and press Tab to accept one.
Using Copilot Chat
- Open the Chat view by pressing Control+Command+i (Mac) or Ctrl+Alt+i (Windows/Linux), or by clicking the chat icon in the VS Code title bar.
- At the bottom of the chat view, type a question in the chat input field and press Enter.
- For example, type:
Create a complete task manager web application with the ability to add, delete, and mark tasks as completed. Include modern CSS styling and make it responsive. Use semantic HTML and ensure it's accessible. Separate markup, styles, and scripts into their own files. - Watch as the agent generates the necessary files and code to implement your request. You should see it update the
index.htmlfile, create astyles.cssfile for styling, and ascript.jsfile for functionality. - Review the generated files and select Keep to accept all the changes.
Configuration
You can enable or disable GitHub Copilot from within your editor and create your own preferred keyboard shortcuts. To configure Copilot:
- Open the Command Palette (Ctrl+Shift+P or Cmd+Shift+P).
- Type "GitHub Copilot" and select "GitHub Copilot: Toggle Copilot" to enable or disable inline suggestions.
- To change keyboard shortcuts, go to File > Preferences > Keyboard Shortcuts, search for "GitHub Copilot," and assign your preferred keys.
Setting Up Copilot in JetBrains IDEs
Installation
- Open your JetBrains IDE (e.g., IntelliJ IDEA, PyCharm, WebStorm).
- Go to File > Settings (Windows/Linux) or IntelliJ IDEA > Preferences (Mac).
- Navigate to Plugins and search the Marketplace for "GitHub Copilot."
- Install the plugin and restart the IDE if prompted.
Authentication
- After installation, click the Copilot icon in the right side of the IDE window.
- Select "Sign in to GitHub."
- A browser window will open asking you to authorize the IDE. Follow the prompts.
- Once authenticated, the Copilot icon will show a checkmark.
Using Inline Suggestions
- Create a new file with a supported language extension, such as
.jsfor JavaScript. - Type a function header, for example:
function calculateDaysBetweenDates(begin, end) {
- Copilot will automatically suggest an entire function body in grayed text. The exact suggestion may vary.
- To accept the suggestion, press Tab.
- To see alternative suggestions, press Ctrl+Enter (Windows/Linux) or Cmd+Enter (Mac).
Using Copilot Chat
- Open the Copilot Chat window by clicking the Copilot Chat icon at the right side of the JetBrains IDE window.
- In the Copilot Chat window, type a question and press Enter. For example, type
what does this file doto get an explanation of the currently open file. - You can also select a line of code in the editor and then type
explain this linein the chat window to get an explanation of that specific line.
Setting Up Copilot in Neovim
Installation
- Ensure you have Neovim 0.9.0 or later installed.
- Use a plugin manager like vim-plug, packer.nvim, or lazy.nvim to install the copilot.lua plugin.
For vim-plug, add this to your init.vim or init.lua:
Plug "github/copilot.vim"
For lazy.nvim, add this to your init.lua:
{
  "github/copilot.vim",
  event = "InsertEnter",
}
- Run
:PlugInstallor:Lazy syncto install the plugin.
Authentication
- Restart Neovim.
- Run
:Copilot setup. - Follow the prompts in the command line to authenticate with GitHub. A browser window will open asking you to authorize the device.
- Once authenticated, you will see a confirmation message.
Using Inline Suggestions
- Open a file with a supported language.
- Start typing code. Copilot will show suggestions as grayed text.
- To accept a suggestion, press Tab.
- To cycle through alternative suggestions, press Alt+] (next) and Alt+[ (previous).
- To dismiss a suggestion, press Ctrl+E or continue typing.
Using Copilot Chat (via GitHub Copilot CLI)
Neovim does not have a native Copilot Chat plugin. However, you can use the GitHub Copilot CLI tool to ask questions from the terminal. Install the CLI by following the instructions at https://docs.github.com/en/copilot/using-github-copilot/using-the-github-copilot-cli. Then, in Neovim, you can use :!gh copilot explain or :!gh copilot suggest to interact with Copilot without leaving the editor.
Best Practices for Using Copilot
Understand Copilot's Strengths and Weaknesses
GitHub Copilot is an AI coding assistant that helps you write code faster and with less effort, allowing you to focus more energy on problem solving and collaboration. Before you start working with Copilot, it is important to understand when you should and should not use it.
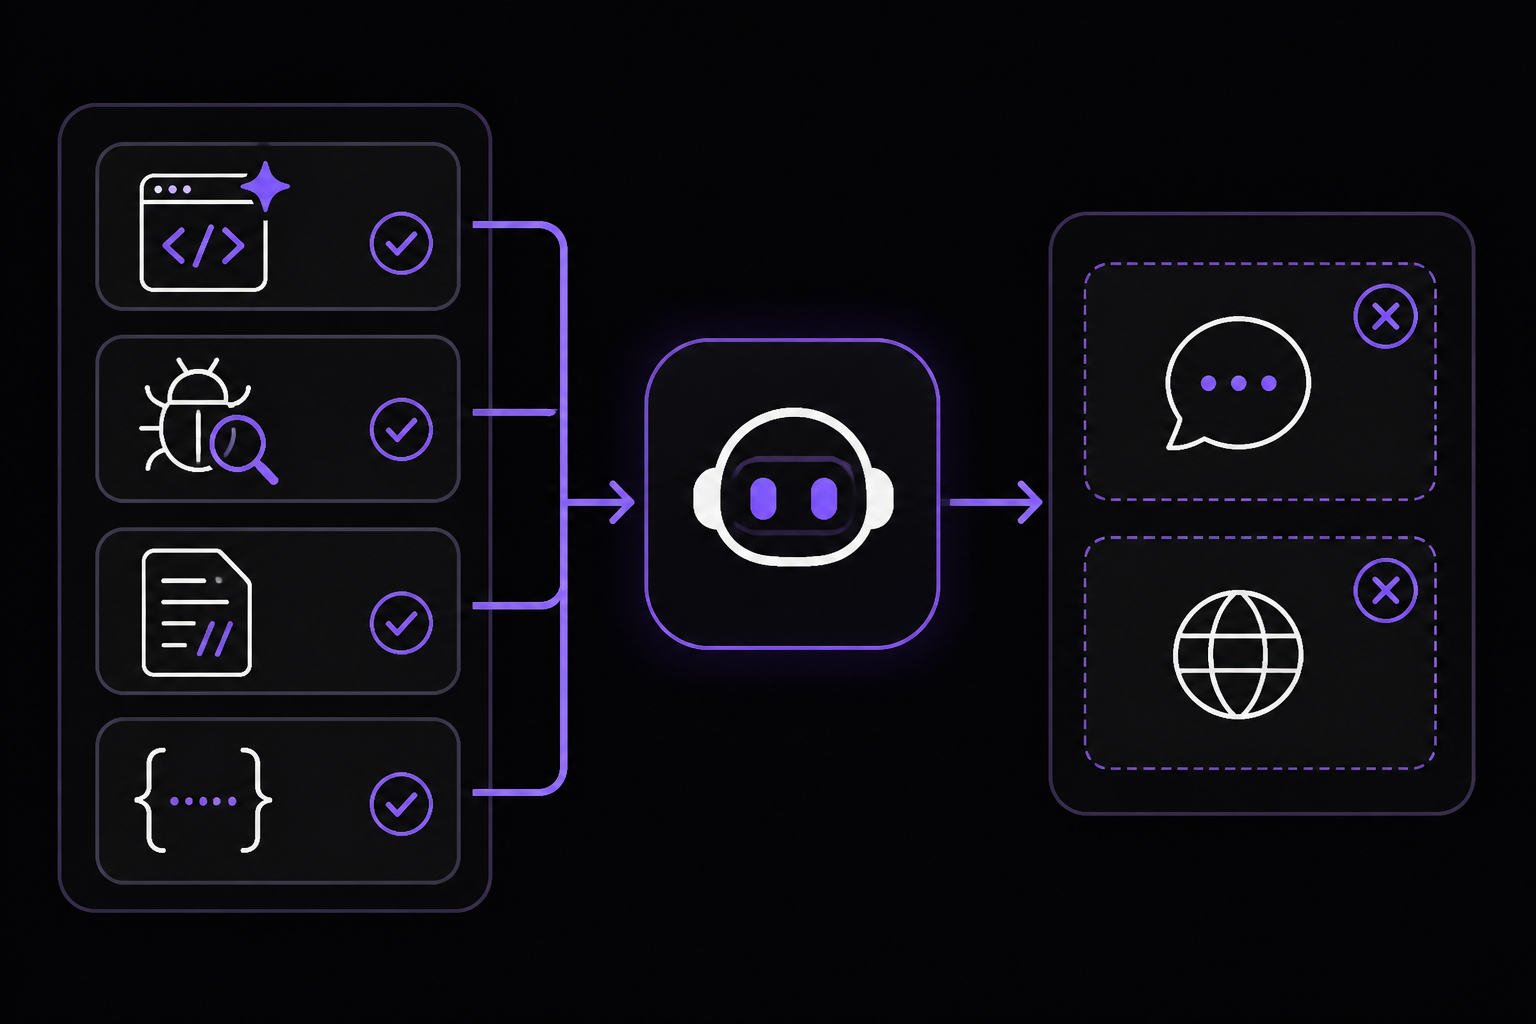
Some of the things Copilot does best include:
- Writing tests and repetitive code.
- Debugging and correcting syntax.
- Explaining and commenting code.
- Generating regular expressions.
Copilot is not designed to:
- Respond to prompts unrelated to coding and technology.
- Replace your expertise and skills. Remember that you are in charge, and Copilot is a powerful tool at your service.
Create Thoughtful Prompts
Prompt engineering, or structuring your request so Copilot can easily understand and respond to it, plays a critical role in Copilot's ability to generate a valuable response. Here are a few quick tips you should remember while crafting your prompts:
- Break down complex tasks into smaller, simpler steps.
- Be specific about your requirements. Instead of "write a function," say "write a function that takes a list of integers and returns the sum of even numbers."
- Provide examples of things like input data, outputs, and implementations.
- Follow good coding practices in your own code, as Copilot learns from the context of your file.
Check Copilot's Work
While Copilot is very powerful, it is still a tool capable of making mistakes, and you should always validate the code it suggests. Use the following tips to ensure you are accepting accurate, secure suggestions:
- Understand suggested code before you implement it. To ensure you fully understand Copilot's suggestion, you can ask Copilot Chat to explain the code.
- Review Copilot's suggestions carefully. Consider not just the functionality and security of the suggested code, but also the readability and maintainability of the code moving forward.
- Use automated tests and tooling to check Copilot's work. With the help of tools like linting, code scanning, and IP scanning, you can automate an additional layer of security and accuracy checks.
Optionally, you may want to check Copilot's work for similarities to existing public code. If you do not want to use similar code, you can turn off suggestions matching public code in your Copilot settings.
Guide Copilot Towards Helpful Outputs
There are several adjustments you can make to steer Copilot towards more valuable responses:
- Provide Copilot with helpful context. If you are using Copilot in your IDE, open relevant files and close irrelevant files. In Copilot Chat, if a particular request is no longer helpful context, delete that request from the conversation. Alternatively, if none of the context of a particular conversation is helpful, start a new conversation.
- If you are using Copilot Chat in GitHub, provide specific repositories, files, symbols, and more as context.
- If you are using Copilot Chat in your IDE, use keywords to focus Copilot on a specific task or piece of context.
- Rewrite your prompts to generate different responses. If Copilot is not providing a helpful response, try rephrasing your prompt, or even breaking your request down into multiple smaller prompts.
- Pick the best available suggestion. When you are using inline suggestions, Copilot might offer more than one suggestion. You can use keyboard shortcuts to quickly look through all available suggestions.
- Provide feedback to improve future suggestions. For inline suggestions, accept or reject Copilot's suggestion. For individual responses in Copilot Chat, click the thumbs up or thumbs down icons next to the response.
Advanced Configuration: Custom Instructions for Code Review
One of the most powerful features of Copilot is the ability to customize its behavior using a .github/copilot-instructions.md file in your repository. This is especially useful for code review, where you can teach Copilot to think like a maintainer.
Setting Up Custom Instructions
Create a file named copilot-instructions.md in the .github directory of your repository. This file contains Markdown that tells Copilot how to behave when reviewing pull requests.
Example: Code Review Instructions
The following example, drawn from a real open-source project, shows how to tune Copilot for code review. The instructions are organized into sections that define the review philosophy, priority areas, project-specific context, CI pipeline context, items to skip, response format, and when to stay silent.
## Review Philosophy

* Only comment when you have HIGH CONFIDENCE (>80%) that an issue exists
* Be concise: one sentence per comment when possible
* Focus on actionable feedback, not observations
* When reviewing text, only comment on clarity issues if the text is genuinely confusing or could lead to errors.

## Priority Areas (Review These)

### Security & Safety

* Unsafe code blocks without justification
* Command injection risks (shell commands, user input)
* Path traversal vulnerabilities
* Credential exposure or hardcoded secrets
* Missing input validation on external data
* Improper error handling that could leak sensitive info

### Correctness Issues

* Logic errors that could cause panics or incorrect behavior
* Race conditions in async code
* Resource leaks (files, connections, memory)
* Off-by-one errors or boundary conditions
* Incorrect error propagation (using `unwrap()` inappropriately)
* Optional types that don't need to be optional
* Booleans that should default to false but are set as optional
* Error context that doesn't add useful information
* Overly defensive code with unnecessary checks
* Unnecessary comments that restate obvious code behavior

### Architecture & Patterns

* Code that violates existing patterns in the codebase
* Missing error handling (should use `anyhow::Result`)
* Async/await misuse or blocking operations in async contexts
* Improper trait implementations

## Project-Specific Context

* This is a Rust project using cargo workspaces
* Core crates: `goose`, `goose-cli`, `goose-server`, `goose-mcp`
* Error handling: Use `anyhow::Result`, not `unwrap()` in production
* Async runtime: tokio
* See HOWTOAI.md for AI-assisted code standards
* MCP protocol implementations require extra scrutiny

## CI Pipeline Context

**Important**: You review PRs immediately, before CI completes. Do not flag issues that CI will catch.

### What Our CI Checks (`.github/workflows/ci.yml`)

**Rust checks:**

* cargo fmt --check
* cargo test --jobs 2
* ./scripts/clippy-lint.sh
* just check-openapi-schema

**Desktop app checks:**

* npm ci
* npm run lint:check
* npm run test:run

**Setup steps CI performs:**

* Installs system dependencies
* Activates hermit environment
* Caches Cargo and npm deps
* Runs npm ci before scripts

**Key insight**: Commands like `npx` check local node_modules first. Don't flag these as broken unless CI wouldn't handle it.

## Skip These (Low Value)

Do not comment on:

* Style/formatting (rustfmt, prettier)
* Clippy warnings
* Test failures
* Missing dependencies (npm ci covers this)
* Minor naming suggestions
* Suggestions to add comments
* Refactoring unless addressing a real bug
* Multiple issues in one comment
* Logging suggestions unless security-related
* Pedantic text accuracy unless it affects meaning

## Response Format

1. State the problem (1 sentence)
2. Why it matters (1 sentence, if needed)
3. Suggested fix (snippet or specific action)

Example:
This could panic if the vector is empty. Consider using `.get(0)` or adding a length check.

## When to Stay Silent

If you're uncertain whether something is an issue, don't comment.
How It Works
- The
Review Philosophysection sets the tone: only comment with high confidence, be concise, and focus on actionable feedback. This immediately cuts down noise. - The
Priority Areassection tells Copilot exactly what to look for. Without this, Copilot might nitpick on style or minor issues. With this, it focuses on security, correctness, and architecture. - The
Project-Specific Contextsection provides essential background. Copilot does not magically know your setup. You have to tell it what kind of project it is reviewing, what error handling patterns to use, and what crates are involved. - The
CI Pipeline Contextsection prevents Copilot from flagging issues that CI will catch anyway. This is important because Copilot reviews PRs immediately, before CI completes. - The
Skip Thesesection tells Copilot what not to bother with. This eliminates low-value comments about formatting, test failures, or minor naming suggestions. - The
Response Formatsection enforces a concise structure: state the problem, why it matters, and a suggested fix. - The
When to Stay Silentsection reminds Copilot that silence is sometimes the right call.
Tuning Over Time
After setting up custom instructions, the difference can be immediate. However, this is not a one-time fix. As more PRs come in, watch how Copilot responds and refine the instructions each time. Expect to observe, adjust, and keep teaching it as your project evolves.
Troubleshooting
Authentication Issues
If you experience authentication issues, try the following:
- Ensure you are signed into GitHub in your editor. In VS Code, click the Copilot icon and select "Sign in to GitHub." In JetBrains, click the Copilot icon and select "Sign in to GitHub." In Neovim, run
:Copilot setupagain. - If you are behind a corporate firewall or proxy, you may need to configure proxy settings. In VS Code, set
http.proxyin settings. In JetBrains, configure proxy settings in File > Settings > Appearance & Behavior > System Settings > HTTP Proxy. - If you have access to GitHub Copilot via your organization, you may not be able to use Copilot Chat if your organization owner has disabled chat. Check with your organization admin.
Inline Suggestions Not Appearing
- Make sure Copilot is enabled. In VS Code, open the Command Palette and run "GitHub Copilot: Toggle Copilot" to ensure it is enabled.
- Ensure you are using a supported language. Copilot works especially well for Python, JavaScript, TypeScript, Ruby, Go, C#, and C++. It also supports many other languages and frameworks.
- Check that your file has a supported file extension.
- If you are in Neovim, ensure the copilot.vim plugin is loaded and that you have authenticated.
Copilot Chat Not Working
- Ensure you have the latest version of the Copilot extension installed.
- If you are using VS Code, make sure the GitHub Copilot Chat extension is installed.
- If you are using JetBrains, make sure the GitHub Copilot plugin is installed and up to date.
- If you are using Neovim, remember that there is no native Copilot Chat plugin. Use the GitHub Copilot CLI instead.
Performance Issues
- If Copilot feels slow, try closing irrelevant files to reduce the context Copilot has to process.
- In large projects, parsing can be expensive. Consider using lazy loading or caching if you are building a custom tool.
- If you are using a terminal-based tool like Oracle (a TUI for Rust code inspection), move heavy parsing to background threads to keep the UI responsive.
Going Further
Once you have Copilot set up and working, there are several areas to explore next:
- Prompt engineering: Learn how to write effective prompts for Copilot Chat. The official documentation has a dedicated guide on prompt engineering for GitHub Copilot Chat.
- Next edit suggestions: In VS Code, you can use next edit suggestions to navigate and accept suggestions for the next edit.
- Copilot on the command line: Use the GitHub Copilot CLI to get suggestions and explanations directly in your terminal.
- Copilot on mobile: Use Copilot on your mobile device with GitHub Mobile.
- Configuration: You can enable or disable GitHub Copilot from within your editor and create your own preferred keyboard shortcuts.
- Custom instructions: As shown in this guide, you can use
.github/copilot-instructions.mdto tune Copilot's behavior for code review and other tasks. - Stay up-to-date: New features are regularly added to Copilot. Check the changelog to stay informed about new abilities, improvements, and user experience changes.
Comments
More Guides
View allfeaturesGitHub Copilot Workspace: Issue-to-PR Workflows with Premium Requests
Learn how to use GitHub Copilot to convert issues into pull requests while managing premium request quotas. Covers model selection, step-by-step implementation, and community-tested workflow patterns.
N
Neura Market ResearchfeaturesGitHub Copilot CLI: Terminal Command Suggestions and Usage Guide
Learn how to use GitHub Copilot for terminal command suggestions, including setup in Windows Terminal and VS Code, custom keybindings for commit messages, usage tracking with community tools, and creative CLI projects.
N
Neura Market ResearchfeaturesGitHub Copilot Extensions: Building and Using Custom Instructions
Learn how to build and use GitHub Copilot custom instructions to make the AI behave predictably in your repos. Covers setup, writing techniques, three generation methods, and real-world troubleshooting.
N
Neura Market ResearchfeaturesGitHub Copilot Code Review: Automated PR Feedback Setup Guide
Learn how to set up and tune GitHub Copilot Code Review for automated PR feedback. Covers enabling the feature, writing custom instructions to reduce noise, and iterating on the setup for long-term value.
N
Neura Market ResearchAgent Mode
GitHub Copilot Agent Mode: Complete Guide 2026
Master Copilot Agent Mode with practical examples for multi-file editing, terminal commands, and autonomous coding workflows.
G
GitHub DocsExtensions
Copilot Extensions: Building Custom Tools and Integrations
Learn to build GitHub Copilot Extensions using the Extensions API to create custom chat participants, slash commands, and MCP integrations.
G
GitHub DocsReady-made automations for this
Workflows from the Neura Market marketplace related to this CoPilot resource
- Customer Authentication for Chat Support with OpenAI and Redis Session Managementn8n · $14.99 · Related topic
- Secure API Endpoint with Bearer Token Authentication and Field Validationn8n · $14.99 · Related topic
- Build Production-Ready User Authentication with Airtable and JWTn8n · $14.99 · Related topic
- Streamline User Authentication with Auth0 and n8nn8n · $14.99 · Related topic