

Writing Effective CLAUDE.md Files for Claude Code Projects
Learn how to write effective CLAUDE.md files for Claude Code projects. This guide covers setup, best practices, hooks, skills, and troubleshooting to give Claude Code persistent project instructions.
This guide covers how to write CLAUDE.md files that give Claude Code persistent project instructions, coding standards, and workflow preferences. It is for developers who want Claude Code to consistently follow their team's conventions, avoid common mistakes, and automate repetitive setup tasks.
What You Need
Before you start, make sure you have:
- Claude Code installed on your machine. See the installation section below for methods on macOS, Linux, Windows (including WSL), and package managers like Homebrew and WinGet.
- A Claude subscription (Pro, Max, Team, or Enterprise), a Claude Console account, or access through a supported cloud provider (Amazon Bedrock, Google Cloud's Agent Platform, Microsoft Foundry, or a self-hosted Claude apps gateway).
- A code project to work with. Any project with a root directory will do.
- A terminal or command prompt open. If you are new to the terminal, review the terminal guide linked in the official documentation.
What is a CLAUDE.md File?
A CLAUDE.md file is a markdown file you place in your project root. Claude Code reads it at the start of every session and uses its contents to guide its behavior. According to the official documentation, you can use it to set:
- Coding standards (naming conventions, file structure, preferred libraries)
- Architecture decisions (design patterns, data flow)
- Review checklists (what to check before committing)
- Build and test commands
- Any other project-specific instructions
Claude Code also builds "auto memory" as it works. It saves learnings like build commands and debugging insights across sessions without you writing anything. But the CLAUDE.md file is your primary way to give explicit, persistent instructions.
Installation Methods for Claude Code
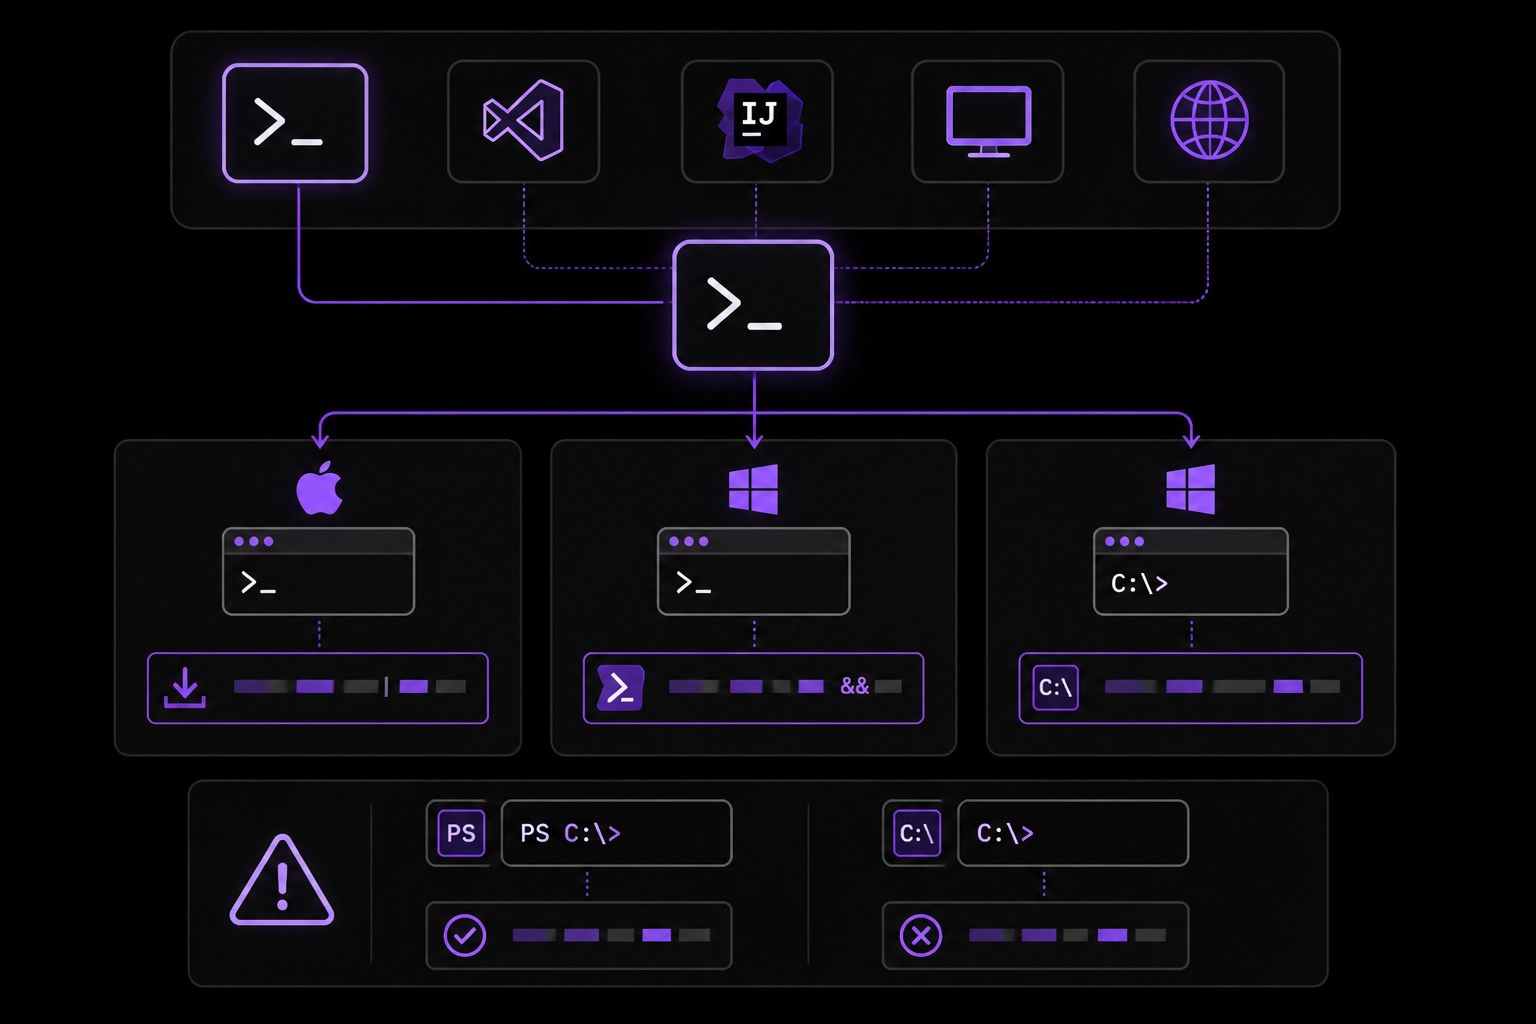
Claude Code runs on several surfaces: terminal, VS Code, JetBrains IDEs, desktop app, and web. This guide focuses on the terminal CLI, which is the most common surface for CLAUDE.md usage. Install using one of these methods:
Native Install (Recommended)
On macOS, Linux, or WSL:
curl -fsSL https://claude.ai/install.sh | bash
On Windows PowerShell:
irm https://claude.ai/install.ps1 | iex
On Windows CMD:
curl -fsSL https://claude.ai/install.cmd -o install.cmd && install.cmd && del install.cmd
Important shell detection: If you see The token '&&' is not a valid statement separator, you are in PowerShell, not CMD. If you see 'irm' is not recognized as an internal or external command, you are in CMD, not PowerShell. Your prompt shows PS C:\ when you are in PowerShell and C:\ without the PS when you are in CMD. If the install command fails with syntax error near unexpected token, refer to the installation troubleshooting page.
Git for Windows note: On native Windows, Git for Windows is recommended so Claude Code can use the Bash tool. If Git for Windows is not installed, Claude Code uses PowerShell as the shell tool instead. WSL setups do not need Git for Windows.
Native installations automatically update in the background to keep you on the latest version.
Homebrew (macOS)
brew install --cask claude-code
Homebrew offers two casks:
claude-codetracks the stable release channel, which is typically about a week behind and skips releases with major regressions.claude-code@latesttracks the latest channel and receives new versions as soon as they ship.
Homebrew installations do not auto-update. Run brew upgrade claude-code or brew upgrade claude-code@latest, depending on which cask you installed, to get the latest features and security fixes.
WinGet (Windows)
winget install Anthropic.ClaudeCode
WinGet installations do not auto-update. Run winget upgrade Anthropic.ClaudeCode periodically to get the latest features and security fixes.
Linux Package Managers
You can also install with apt, dnf, or apk on Debian, Fedora, RHEL, and Alpine. See the advanced setup documentation for details.
Verifying Installation
To confirm the installation worked, run:
claude --version
The command prints a version number followed by (Claude Code).
Logging In
Start an interactive session with the claude command and you will be prompted to log in on first use:
claude
For Claude subscription or Console accounts, follow the prompts to complete authentication in your browser. To switch accounts later or re-authenticate, type /login inside the running session:
/login
You can log in using any of these account types:
- Claude Pro, Max, Team, or Enterprise (recommended)
- Claude Console (API access with pre-paid credits). On first login, a "Claude Code" workspace is automatically created in the Console for centralized cost tracking.
- Amazon Bedrock, Google Cloud's Agent Platform, or Microsoft Foundry (enterprise cloud providers)
- A self-hosted Claude apps gateway, if your organization runs one: your admin pre-configures the gateway URL, and
/loginopens directly on the Cloud gateway screen for you to sign in with corporate SSO
Once logged in, your credentials are stored and you will not need to log in again.
Creating Your First CLAUDE.md File
Place the file in your project root directory. Name it exactly CLAUDE.md (case-sensitive on some file systems). The file is plain markdown, so you can use headings, lists, code blocks, and other standard markdown syntax.
Minimal Example
Here is a minimal CLAUDE.md file that sets basic coding standards:
# Project: My App

## Coding Standards

- Use TypeScript for all new files
- Follow the existing ESLint configuration
- Prefer functional components over class components in React
- Use async/await instead of callbacks

## Architecture

- The app follows a feature-based folder structure
- Shared utilities go in `src/lib/`
- API calls go in `src/services/`
- State management uses Zustand

## Testing

- Run `npm test` before committing
- Write unit tests for all new functions
- Use Vitest as the test runner
- Aim for 80% code coverage

## Commands

- Build: `npm run build`
- Lint: `npm run lint`
- Format: `npm run format`
What Each Section Does
- Coding Standards: Tells Claude Code what style and conventions to follow when writing or editing code. This prevents it from introducing inconsistent patterns.
- Architecture: Describes the high-level structure. Claude Code will use this to decide where to place new files and how to organize imports.
- Testing: Specifies the test runner, commands, and coverage targets. Claude Code will run these commands when you ask it to write or run tests.
- Commands: Lists common build, lint, and format commands. Claude Code can run these automatically when needed.
Advanced CLAUDE.md Configuration
Using Hooks
Hooks let you run shell commands before or after Claude Code actions. For example, you can auto-format after every file edit or run lint before a commit. Hooks are defined in the CLAUDE.md file using a special syntax.
Example of a post-edit hook that formats the file after Claude Code edits it:
## Hooks

- `post-edit`: `npx prettier --write {file}`
- `pre-commit`: `npm run lint`
The {file} placeholder is replaced with the path of the file that was edited. This ensures formatting is applied immediately after each change.
Defining Skills
Skills are repeatable workflows you can package and share with your team. They appear as commands in the Claude Code interface. Define them in your CLAUDE.md file:
## Skills

### /review-pr

Review the current pull request for code quality, security issues, and adherence to project standards.

### /deploy-staging

Deploy the current branch to the staging environment. Runs tests first, then builds and deploys.

### /generate-docs

Generate API documentation from JSDoc comments in the `src/` directory.
When you type / in Claude Code, these skills appear in the command list. You can also use Tab for command completion.
Setting Permission Modes
You can specify the default permission mode for Claude Code in your CLAUDE.md file. The available modes are:
- default: Claude asks for approval before each file change.
- acceptEdits: Auto-approves file edits.
- plan: Claude proposes changes without editing.
- auto: Runs a background safety check and blocks risky actions, returning to prompts only after repeated blocks. This mode is available for some accounts.
Example:
## Permissions

- Mode: acceptEdits
You can also cycle through modes during a session by pressing Shift+Tab.
Best Practices for Writing CLAUDE.md Files
Based on the official documentation and community experience, follow these practices:
Be Specific and Explicit
Instead of vague instructions like "write good code," provide concrete rules:
## Coding Standards

- Use 2-space indentation
- Maximum line length is 100 characters
- Use single quotes for strings
- End files with a newline
Include Build and Test Commands
Claude Code can run commands, but it needs to know which ones. List them explicitly:
## Commands

- Build: `npm run build`
- Test: `npm test`
- Lint: `npm run lint`
- Type check: `npx tsc --noEmit`
Document Architecture Decisions
If your project has specific architectural patterns, document them:
## Architecture

- The frontend uses Next.js with App Router
- API routes are in `src/app/api/`
- Database access goes through Prisma ORM
- Authentication uses NextAuth.js
Set Review Checklists
Define what Claude Code should check before considering a task complete:
## Review Checklist

- [ ] All new code has unit tests
- [ ] No console.log statements left in production code
- [ ] Error handling is in place for API calls
- [ ] TypeScript types are properly defined
- [ ] Documentation is updated if needed
Use Auto Memory
Claude Code automatically saves learnings across sessions. For example, if you manually run a build command once, Claude Code remembers it for future sessions. You do not need to add it to CLAUDE.md unless you want to override or supplement the auto memory.
Troubleshooting
CLAUDE.md Not Being Read
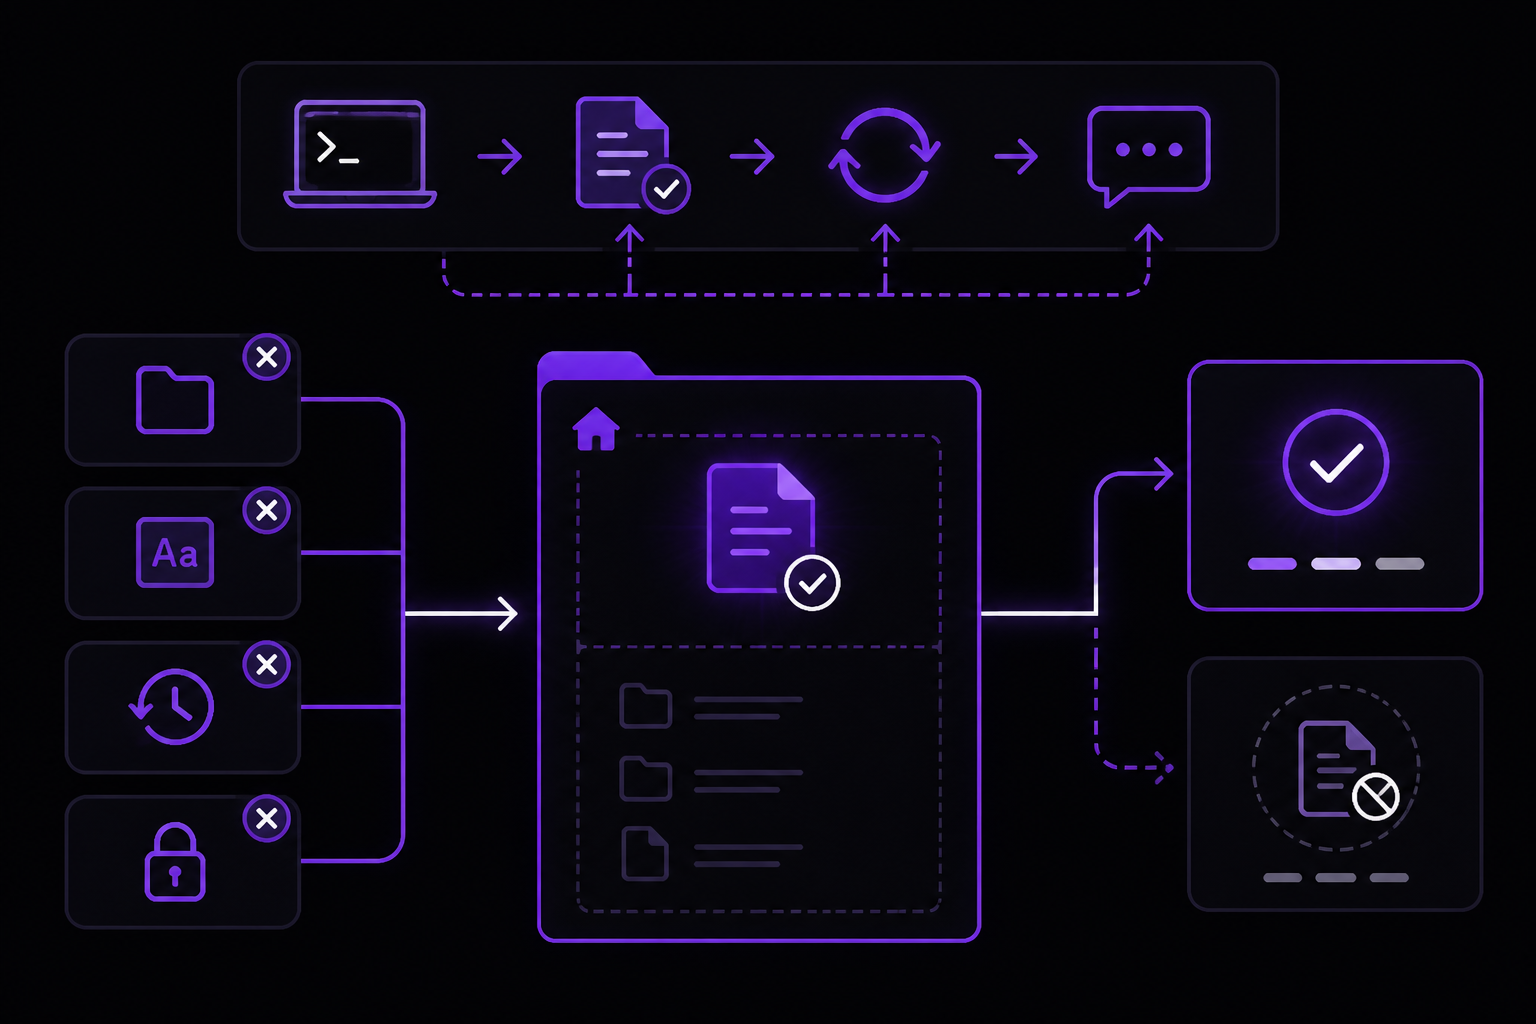
If Claude Code is not following your CLAUDE.md instructions, check:
- File location: The file must be in the project root directory. Subdirectories are not checked.
- File name: It must be exactly
CLAUDE.md(case-sensitive on case-sensitive file systems). - Session restart: Claude Code reads the file at the start of each session. If you edit the file during a session, you need to restart the session for changes to take effect. Use
/clearto clear the conversation history and reload the file. - Permissions: Ensure Claude Code has read access to the file.
Conflicting Instructions
If you have multiple CLAUDE.md files in different directories, only the one in the project root is used. If you have conflicting instructions within the same file, Claude Code may prioritize the most specific or most recent instruction. To avoid confusion, keep instructions consistent and non-contradictory.
Skills Not Appearing
If your custom skills are not showing up in the / command list:
- Ensure the skills are defined under a
## Skillsheading. - Restart the session after adding skills.
- Check that the skill names start with
/. - Verify that the skill descriptions are clear and actionable.
Hooks Not Running
If hooks are not executing:
- Check the hook syntax. The command must be on the same line as the hook name.
- Ensure the hook name is one of the supported types:
post-edit,pre-commit, etc. - Verify that the command is valid and executable in your environment.
- Check that Claude Code has permission to run shell commands.
Going Further
Now that you understand CLAUDE.md files, explore these advanced topics from the official documentation:
- How Claude Code works: Understand the agentic loop, built-in tools, and how Claude Code interacts with your project.
- Best practices: Get better results with effective prompting and project setup.
- Common workflows: Step-by-step guides for common tasks like refactoring, writing tests, and code review.
- Extend Claude Code: Customize with skills, hooks, MCP (Model Context Protocol), and more. MCP connects Claude Code to external data sources like Google Drive, Jira, and Slack.
- Settings: Customize Claude Code for your workflow, including permission modes and credential management.
- Agent teams: Spawn multiple Claude Code agents that work on different parts of a task simultaneously.
- Scheduled tasks: Run Claude on a schedule to automate recurring work like morning PR reviews or weekly dependency audits.
- CI/CD integration: Automate code review and issue triage with GitHub Actions or GitLab CI/CD.
For community support, join the Claude Code Discord server for tips and troubleshooting from other users.
Comments
More Guides
View all claude-code
Running Claude Code in CI Pipelines Without Interactive Prompts
Learn how to run Claude Code in CI/CD pipelines without interactive prompts. Covers authentication, permission configuration, GitHub Actions and GitLab CI integration, and troubleshooting common issues.
 agents
Claude Code Quickstart: Install, Setup, and Automate Desktop Tasks
Learn how to install, configure, and start using Claude Code to automate desktop tasks, fix bugs, manage Git workflows, and build features directly from your terminal, IDE, or desktop app.
 productivity
Claude Code: Complete Guide to Settings, Permissions, and Configuration
Complete guide to Claude Code settings, permissions, and configuration scopes. Learn how to manage user, project, local, and managed settings, use the /config command, and handle invalid entries.
 api
apiBatch Processing with the Claude Message Batches API
Learn to use the Claude Message Batches API for cost-effective, high-throughput processing of multiple prompts. Covers setup, batch creation, monitoring, result retrieval, and troubleshooting with practical examples.
 mcp
mcpConnecting Claude to Your Database with MCP: A Complete Guide
Learn how to connect Claude Code to your database using the Model Context Protocol (MCP). This guide covers setup, configuration, querying, and advanced usage with real-world examples.
 claude-code
Claude Code with GitHub Actions: Automated Code Review Setup Guide
Learn how to set up Claude Code with GitHub Actions for automated code review, issue triage, and CI/CD workflows. Covers workflow configuration, authentication, CLI flags, and best practices.