
Building Custom GPTs: Complete Step-by-Step Guide for ChatGPT
A complete step-by-step guide to building custom GPTs in ChatGPT. Covers prerequisites, the GPT builder interface, configuring instructions, knowledge, capabilities, and actions, plus troubleshooting and advanced topics.
This guide covers everything you need to know to build custom GPTs in ChatGPT, from understanding what they are to configuring advanced features like actions, knowledge, and capabilities. It is written for ChatGPT users who want to create tailored AI assistants for personal use, team collaboration, or public publishing in the GPT Store.
What You Need
Before you start building a custom GPT, you need the following:
- A ChatGPT account. Custom GPTs are available to ChatGPT Free, Plus, Pro, Team, Enterprise, and Edu users. Free tier users can use GPTs created by others but cannot create their own. To create and edit GPTs, you need a Plus, Pro, Team, Enterprise, or Edu subscription. According to the official documentation, "Free tier users have access to a range of chat capabilities, tools, and GPTs. The default model and available limits can change over time." Creating GPTs requires a paid plan.
- A web browser or the ChatGPT mobile app. The GPT builder interface is accessible on the web at chat.openai.com and in the ChatGPT iOS and Android apps. The macOS and Windows desktop apps also support GPT creation.
- An OpenAI API key (optional). If you plan to connect your GPT to external APIs using actions, you may need an API key or other authentication credentials for the external service. This is not required for basic GPT creation.
- Knowledge files (optional). You can upload files (PDFs, Word docs, text files, etc.) to give your GPT specialized knowledge. The official documentation lists supported file types: "File uploads for ChatGPT" includes PDF, Microsoft Word, Microsoft PowerPoint, Microsoft Excel, plain text, and more.
- A clear purpose for your GPT. Before you start, define what your GPT should do. The official documentation emphasizes that "GPTs in ChatGPT" are custom versions of ChatGPT that can be tailored for a specific purpose. Knowing your goal helps you write better instructions and choose the right capabilities.
Understanding Custom GPTs
Custom GPTs are tailored versions of ChatGPT that you can create for a specific purpose. According to the official documentation, "GPTs in ChatGPT" are "custom versions of ChatGPT that can be tailored for a specific purpose." They can include custom instructions, knowledge files, capabilities (like web browsing, DALL-E image generation, and code interpretation), and actions that connect to external APIs.
What Custom GPTs Can Include
Each custom GPT can have:
- Instructions: A system prompt that defines the GPT's behavior, tone, constraints, and goals. This is the most important part of your GPT.
- Knowledge: Uploaded files that the GPT can reference to answer questions. This is useful for domain-specific information, company policies, product documentation, etc.
- Capabilities: Built-in tools that the GPT can use. These include web browsing (to search the internet), DALL-E image generation (to create images), and code interpreter (to run Python code, analyze data, and generate charts).
- Actions: Connections to external APIs. This allows your GPT to interact with other services, such as fetching data from a database, sending emails, or updating a CRM.
- Apps: Pre-built integrations with third-party services like Google Drive, Microsoft Teams, Notion, and others. The official documentation lists many "apps with sync" that can bring your tools and data into ChatGPT.
Who Can Use and Build Custom GPTs
- Free tier users: Can use GPTs created by others but cannot create or edit them.
- Plus and Pro users: Can create, edit, and share GPTs. They can also publish GPTs to the GPT Store.
- Team, Enterprise, and Edu users: Can create GPTs for internal workspace use. Workspace admins can manage GPT access, collaboration, and usage policies. The official documentation has a dedicated section on "Managing GPT access in Enterprise and Edu workspaces."
Privacy and Data Controls
When you create a GPT, you control its visibility. You can keep it private (only you can use it), share it via a link, or publish it to the GPT Store. The official documentation states that "GPTs in ChatGPT" interact with privacy settings: "GPTs in ChatGPT Learn what GPTs are in ChatGPT, what they can include, who can use and build them, and how they interact with privacy, workspaces, and the GPT Store." If you enable capabilities like web browsing or code interpreter, the GPT will use those tools within the conversation. Your conversations with a GPT are subject to the same data controls as regular ChatGPT conversations. You can manage your data settings in the Data Controls section of your ChatGPT settings.
Step-by-Step: Creating a Custom GPT
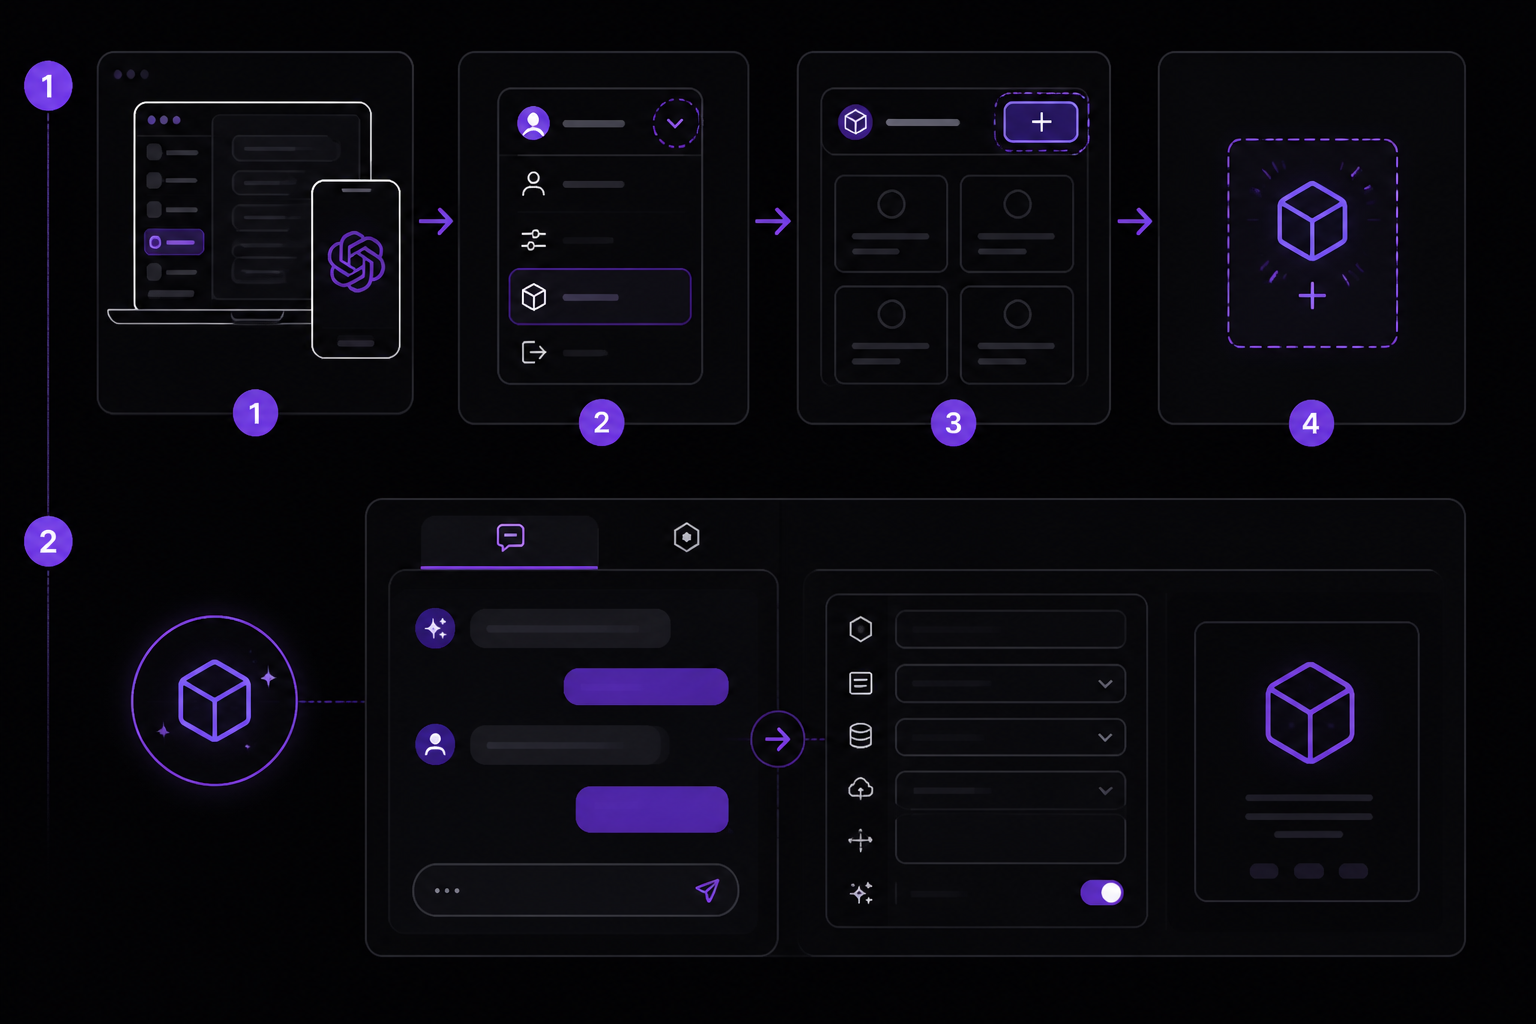
Step 1: Access the GPT Builder
- Log in to your ChatGPT account on the web or open the mobile app.
- Click on your profile name or the settings icon in the bottom-left corner of the screen.
- Select "My GPTs" from the menu. If you are on a paid plan, you will see a "Create a GPT" button.
- Click "Create a GPT" to open the GPT builder interface.
Alternatively, you can navigate directly to chat.openai.com/gpts and click "Create a GPT."
Step 2: Configure Your GPT Using the Builder
The GPT builder has two tabs: "Create" and "Configure." The "Create" tab uses a conversational interface where you can describe your GPT in natural language, and ChatGPT will help you build it. The "Configure" tab gives you full manual control over every setting.
Using the Create Tab (Conversational Builder)
In the "Create" tab, you can chat with the GPT builder to define your GPT. For example, you can say:
"I want a GPT that helps me write marketing copy for social media posts. It should be friendly and creative, and it should know about my company's products."
The builder will then generate a name, description, instructions, and profile picture for your GPT. You can accept, modify, or reject each suggestion. This is a fast way to get started, but you may want to fine-tune the settings in the "Configure" tab.
Using the Configure Tab (Manual Setup)
The "Configure" tab provides all the settings in one place. Here is what each field does:
- Name: A short, descriptive name for your GPT. This is what users will see in the GPT Store or when they interact with your GPT.
- Description: A brief explanation of what your GPT does. This appears in the GPT Store and when users browse GPTs.
- Instructions: The system prompt. This is the most critical part. Write clear, specific instructions that define your GPT's behavior, tone, constraints, and goals. The official documentation on "Creating and editing GPTs" states: "Instructions: How the GPT should behave. This is the system prompt." Be explicit about what the GPT should do, what it should avoid, and how it should respond.
- Conversation starters: Pre-written prompts that appear as buttons when users start a conversation with your GPT. These help users understand what your GPT can do. You can add up to four conversation starters.
- Knowledge: Upload files that your GPT can reference. Click "Upload files" and select your documents. The GPT will use these files to answer questions. The official documentation notes that "File Uploads FAQ" covers supported file types: PDF, Microsoft Word, Microsoft PowerPoint, Microsoft Excel, plain text, and others. You can also connect to apps like Google Drive or Notion to access files stored there.
- Capabilities: Toggle switches to enable or disable built-in tools:
- Web Browsing: Allows the GPT to search the internet for up-to-date information. This is useful for tasks that require current data, like news summaries or research.
- DALL-E Image Generation: Allows the GPT to create images based on text descriptions. Useful for design, marketing, or creative tasks.
- Code Interpreter: Allows the GPT to run Python code, analyze data, create charts, and perform mathematical calculations. This is essential for data analysis, scientific computing, and automation tasks.
- Actions: Connect your GPT to external APIs. This is covered in detail in the "Configuring Actions" section below.
- Apps: Connect to third-party services like Google Drive, Microsoft Teams, Notion, and others. The official documentation lists many "apps with sync" that can bring your tools and data into ChatGPT.
Step 3: Test Your GPT
Once you have configured your GPT, you can test it in the preview pane on the right side of the builder. Type a message and see how your GPT responds. This is an iterative process: test, adjust instructions, test again. The official documentation recommends: "Test your GPT in the preview pane to see how it responds. Adjust instructions and settings as needed."
Step 4: Save and Share Your GPT
When you are satisfied with your GPT, click "Save" in the top-right corner. You will be prompted to choose who can access your GPT:
- Only me: The GPT is private and only you can use it.
- Anyone with the link: Anyone who has the link can use the GPT. This is useful for sharing with a specific group of people.
- Public: The GPT is published to the GPT Store, where anyone can find and use it. Publishing to the GPT Store requires meeting OpenAI's guidelines and policies. The official documentation on "Sharing and publishing GPTs" covers the requirements and process.
After saving, you can share the link or manage the GPT from the "My GPTs" page.
Configuring Actions in Custom GPTs
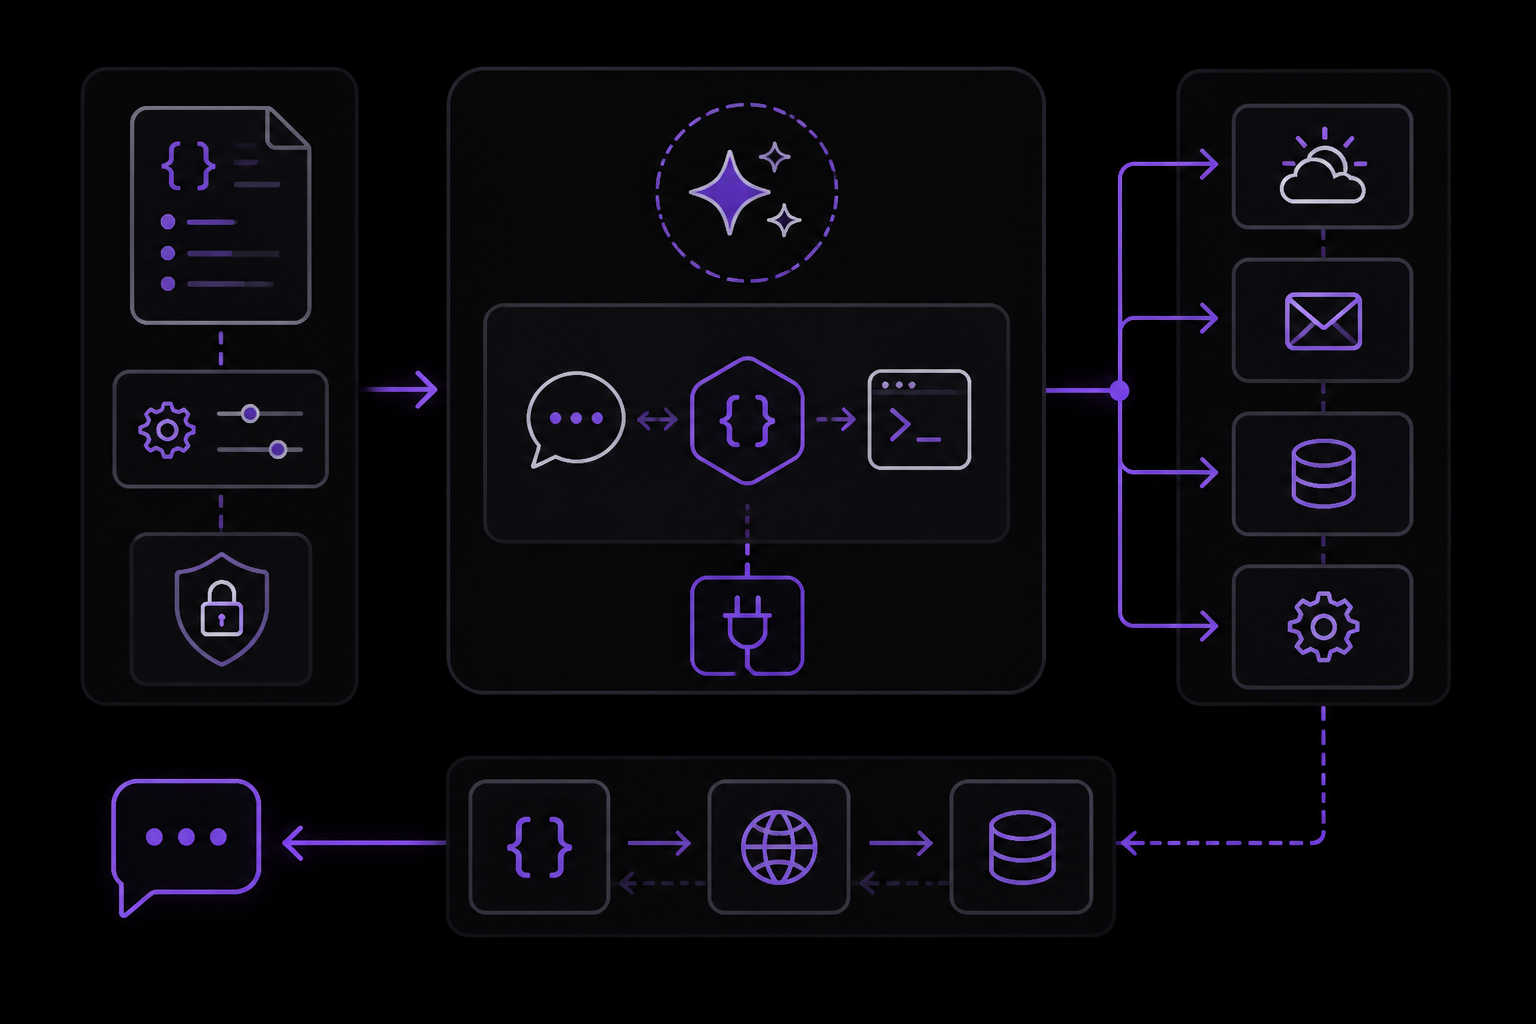
Actions allow your GPT to connect to external APIs. This is the most advanced feature of custom GPTs. The official documentation has a dedicated guide on "Configuring actions in GPTs." Here is what you need to know.
What Are Actions?
Actions are API endpoints that your GPT can call to fetch data or perform actions outside of ChatGPT. For example, you could create a GPT that checks the weather, sends an email, or updates a database. Actions are defined using an OpenAPI specification (a JSON or YAML schema that describes the API endpoints, parameters, and authentication).
How to Add an Action
- In the "Configure" tab of your GPT, scroll down to the "Actions" section.
- Click "Add action."
- You have two options:
- Import from URL: Provide a URL to an OpenAPI schema file (JSON or YAML).
- Import from file: Upload an OpenAPI schema file.
- Paste schema: Paste the OpenAPI schema directly into the text area.
- Configure authentication if required. The official documentation lists supported authentication methods:
- None: No authentication.
- API Key: The GPT will send an API key in the request header.
- Bearer Token: The GPT will send a bearer token in the Authorization header.
- OAuth 2.0: The GPT will use OAuth 2.0 to authenticate. This requires setting up an OAuth client ID and secret.
- Save the action.
OpenAPI Schema Example
Here is a simple OpenAPI schema for a weather API, adapted from the official documentation:
openapi: 3.0.0
info:
  title: Weather API
  description: Get current weather for a location.
  version: 1.0.0
servers:
  - url: https://api.example.com
paths:
  /weather:
    get:
      summary: Get current weather
      parameters:
        - name: location
          in: query
          required: true
          schema:
            type: string
          description: City and country, e.g. Bogotá, Colombia
        - name: units
          in: query
          schema:
            type: string
            enum: [celsius, fahrenheit]
          description: Units for temperature
      responses:
        '200':
          description: Weather data
          content:
            application/json:
              schema:
                type: object
                properties:
                  temperature:
                    type: number
                  unit:
                    type: string
                  description:
                    type: string
This schema tells the GPT that it can call GET /weather with a location parameter and optionally a units parameter. The GPT will parse the response and use it in its reply.
Authentication Configuration
If your API requires authentication, you need to configure it in the action settings. The official documentation explains:
- API Key: You provide the key name (e.g.,
X-API-Key) and the key value. The GPT will include this in every request header. - Bearer Token: You provide the token. The GPT will include
Authorization: Bearer <token>in every request. - OAuth 2.0: You provide the client ID, client secret, authorization URL, token URL, and scopes. The GPT will handle the OAuth flow to obtain and refresh tokens.
Best Practices for Actions
- Write clear descriptions for each endpoint and parameter. The GPT uses these descriptions to decide when to call the action and how to fill in parameters.
- Use enums for parameters that have a fixed set of values. This reduces errors.
- Keep schemas simple. Complex nested schemas can confuse the GPT. Flatten parameters where possible.
- Test thoroughly. Use the preview pane to test each action with different inputs.
Adding Knowledge to Your GPT
Knowledge files give your GPT domain-specific information. The official documentation states: "Knowledge: Upload files that the GPT can reference to answer questions." This is useful for:
- Company policies and procedures
- Product documentation
- Research papers
- Training manuals
- Any other text-based information
Supported File Types
According to the "File Uploads FAQ" in the official documentation, ChatGPT supports the following file types for upload:
- PDF (.pdf)
- Microsoft Word (.docx)
- Microsoft PowerPoint (.pptx)
- Microsoft Excel (.xlsx)
- Plain text (.txt)
- CSV (.csv)
- JSON (.json)
- And others
How to Upload Knowledge Files
- In the "Configure" tab, scroll to the "Knowledge" section.
- Click "Upload files."
- Select one or more files from your computer.
- The files will be processed and added to your GPT's knowledge base.
You can also connect to apps like Google Drive or Notion to access files stored there. The official documentation has a guide on "Add files from connected apps in ChatGPT."
How the GPT Uses Knowledge
When a user asks a question, the GPT searches its knowledge files for relevant information. It uses a retrieval-augmented generation (RAG) approach: it finds the most relevant passages from your files and uses them to generate a response. The official documentation notes that this is similar to how "apps with sync" work: "Index selected knowledge sources in advance to speed up and improve ChatGPT's answers."
Tips for Knowledge Files
- Use clear, well-structured documents. The GPT works best with documents that have clear headings and logical structure.
- Keep files focused. Upload only relevant information. Too much irrelevant information can confuse the GPT.
- Update files as needed. You can delete and re-upload files to keep knowledge current.
- Combine with instructions. Use the instructions to tell the GPT when to prioritize knowledge files over its general training.
Managing and Editing Custom GPTs
Once you have created a GPT, you can manage it from the "My GPTs" page. Here you can:
- Edit: Click on a GPT to open it in the builder and make changes.
- Delete: Remove a GPT permanently. This cannot be undone.
- Share: Get a shareable link or change visibility settings.
- View analytics (for published GPTs): See usage statistics if your GPT is published to the GPT Store.
Version History
The official documentation mentions that GPTs have version history: "Creating and editing GPTs Create, configure, test, and manage GPTs in ChatGPT, including instructions, knowledge, capabilities, apps, actions, and version history." This allows you to revert to previous versions if needed. To access version history, open your GPT in the builder and look for the version history option (usually in the settings or menu).
Sharing and Publishing
The official documentation on "Sharing and publishing GPTs" covers the following options:
- Share via link: Anyone with the link can use your GPT. You can revoke the link at any time.
- Publish to GPT Store: Your GPT becomes publicly discoverable. You must follow OpenAI's usage policies and guidelines. The GPT Store has categories and featured sections.
- Workspace sharing (Team/Enterprise/Edu): You can share GPTs within your workspace. Workspace admins can control who can create, use, and publish GPTs.
If your GPT is restricted from sharing (e.g., it violates policies), you can appeal the decision. The official documentation has a guide on "Appealing a GPT restricted from sharing."
Troubleshooting Custom GPTs
The official documentation includes a dedicated "Troubleshooting GPTs" guide. Here are common issues and solutions:
GPT Not Following Instructions
- Problem: Your GPT ignores or misinterprets your instructions.
- Solution: Review your instructions. Be more specific and explicit. Use examples. The official documentation recommends: "Write clear and detailed function names, parameter descriptions, and instructions." This applies to GPT instructions too. Break down complex tasks into steps. Use bullet points or numbered lists in the instructions.
GPT Not Using Knowledge Files
- Problem: Your GPT does not reference uploaded files.
- Solution: Ensure the files are uploaded correctly. Check that the file types are supported. In the instructions, explicitly tell the GPT to use the knowledge files. For example: "You have access to the company policy document. Always reference it when answering questions about company policies."
Actions Not Working
- Problem: Your GPT fails to call an action or gets an error.
- Solution: Check the OpenAPI schema for errors. Test the API endpoint independently (e.g., using curl or Postman). Verify authentication credentials. The official documentation on "Configuring actions in GPTs" provides detailed troubleshooting steps. Common issues include:
- Incorrect URL or endpoint path
- Missing required parameters
- Authentication failure (wrong API key, expired token)
- Schema not matching the actual API response
GPT Performance Issues
- Problem: Your GPT responds slowly or produces low-quality responses.
- Solution: Reduce the number of capabilities enabled. Too many tools can slow down the GPT. Simplify instructions. Keep knowledge files focused and concise. The official documentation notes that "callable function definitions count against the model's context limit and are billed as input tokens." This applies to GPT instructions and knowledge as well.
Sharing or Publishing Issues
- Problem: You cannot share or publish your GPT.
- Solution: Check that your GPT meets OpenAI's usage policies. If it was restricted, you can appeal. The official documentation has a guide on "Appealing a GPT restricted from sharing." Also ensure your account is in good standing and you have the correct subscription plan.
General Troubleshooting Tips
- Test in the preview pane before saving. This catches many issues early.
- Iterate. Building a good GPT often requires multiple rounds of testing and refinement.
- Consult the official documentation. The "Troubleshooting GPTs" guide covers many common issues.
- Check the community. While not official, community forums like Reddit and OpenAI's community forum can provide additional tips and solutions.
Going Further
After you have built your first custom GPT, you can explore more advanced topics:
- Function calling via the API: The official documentation on "Function calling" (source 2) provides a deep dive into how to give models access to external functions using the OpenAI API. This is the underlying technology behind GPT actions. Understanding function calling helps you design better actions and debug issues.
- Tool search: For applications with many functions, the official documentation describes "tool search" which allows the model to search for and load relevant tools on demand. This is supported in
gpt-5.4and later models. - Apps with sync: The official documentation lists many third-party integrations (Google Drive, Notion, Microsoft Teams, etc.) that can bring your tools and data into ChatGPT. These can be used in custom GPTs to access external data without writing custom actions.
- OpenAI Academy courses: The official documentation mentions "OpenAI Academy courses" that can help you learn more about building with AI. These courses cover prompt engineering, function calling, and other advanced topics.
- The GPT Store: Once your GPT is published, you can monitor its usage and gather feedback. The official documentation provides guidance on managing published GPTs.
- Fine-tuning: For advanced use cases, the official documentation suggests considering fine-tuning to increase function calling accuracy for large numbers of functions or difficult tasks. This is covered in a cookbook linked from the function calling guide.
Building custom GPTs is an iterative process. Start with a clear purpose, test thoroughly, and refine based on feedback. The official documentation and community resources provide everything you need to create powerful, tailored AI assistants.
Comments
More Guides
View all api
apiOpenAI Batch API: Cut Costs for Bulk Processing
Learn how to use the OpenAI Batch API to cut costs by 50% for bulk processing tasks. Covers setup, request formatting, job creation, monitoring, error handling, and troubleshooting.
 prompting
ChatGPT for Coding: Prompt Patterns That Produce Working Code
Learn how to write prompts for ChatGPT that reliably generate working code. Covers core concepts, setup, and specific patterns for different coding tasks.
 api
apiOpenAI Vision API: Processing Images with GPT Models
Learn how to use the OpenAI Vision API to analyze images with GPT models. Covers setup, sending images via URL, Base64, or file ID, controlling detail levels, cost calculation, and troubleshooting.
 api
apiStreaming ChatGPT Responses in Web Applications: A Complete Guide
Learn how to stream ChatGPT responses in web applications using the OpenAI API. This guide covers setup, implementation in JavaScript and Python, event handling, and troubleshooting for real-time text generation.
 api
apiOpenAI Embeddings for Semantic Search: A Practical Guide
Learn how to use OpenAI's text embedding models for semantic search, clustering, recommendations, and classification. This guide covers concepts, setup, API usage, dimension reduction, and practical tips from official documentation and community experience.
 api
apiHandling OpenAI API Rate Limits and Quota Errors: A Complete Guide
Learn how to handle OpenAI API rate limits (429) and quota errors. Covers error types, exponential backoff, Python library exceptions, and troubleshooting steps for production applications.