
Back to Blog aidlc
aidlc gemma
gemma community
 ai
ai ai
ai githubactions
 ai
ai
Building an Autonomous E2E Test Generation Framework with Kiro CLI
Muhammad Awais June 5, 2026
0 views
How I Built an AIDLC E2E Test Case Generator Using .kiro Specs — From Feature Requirements to Passing...
How I Built an AIDLC E2E Test Case Generator Using .kiro Specs — From Feature Requirements to Passing Playwright Tests
Introduction
Testing web applications end-to-end is often tedious. You write tests, they break, you rewrite them. But what if you could follow a structured, AI-driven development lifecycle (AIDLC) that generates feature requirements from your actual deployed app, then derives test cases systematically from those requirements?
In this article, I’ll walk you through how I built a complete E2E testing pipeline for a Social Media Event Attendee Banner Generator app using the .kiro spec-driven approach — going from analyzing the live DOM to generating Feature Requirements (FRs), Test Specs (TSs), and finally passing Playwright tests.
The App Under Test
The app is a simple but functional web tool that lets users:
- Upload a headshot image
- Crop it to a square using Cropper.js
- Enter their name, designation, and company
- Generate a professional event banner on an HTML5 Canvas Auto-download it as a PNG
- Tech Stack: HTML5, CSS3, Vanilla JS, jQuery, Cropper.js, Bootstrap 5, Canvas API
Deployed at: https://event-attendee-banner-generator.vercel.app/
The AIDLC Flow
Here’s the complete flow from app analysis to passing tests:
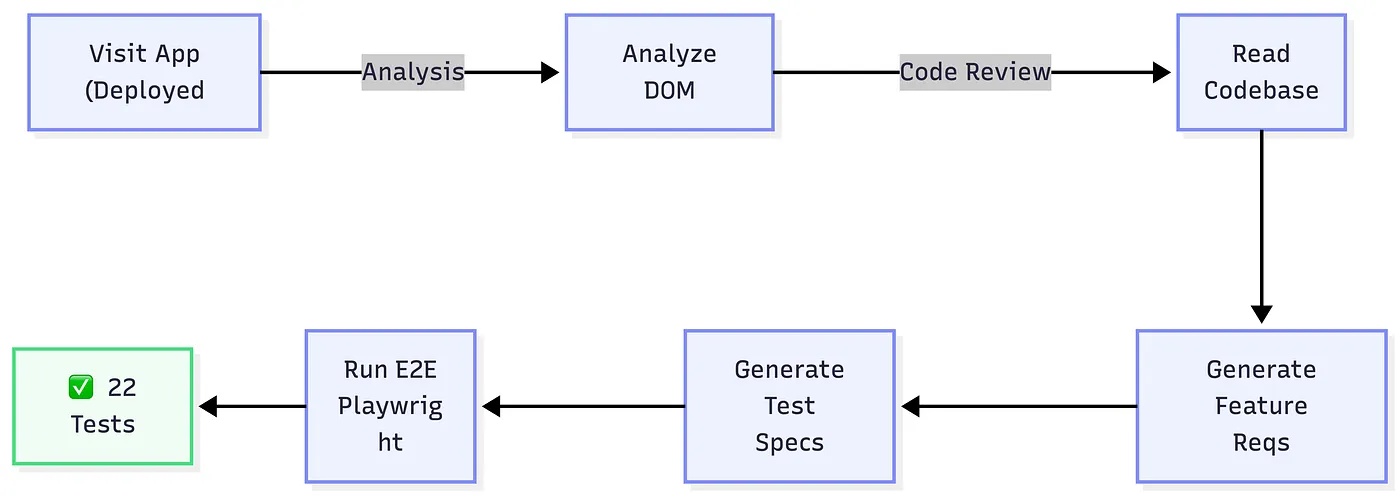
Step 1: Project Structure — The .kiro Way
Instead of writing tests directly, we first establish a spec-driven structure:
.kiro/
├── docs/
│   └── product-context.md          # App overview & tech stack
├── specs/
│   ├── feature-requirements/       # FR-1 through FR-7
│   │   ├── FR-1-page-load-and-layout.md
│   │   ├── FR-2-image-upload.md
│   │   ├── FR-3-image-cropping.md
│   │   ├── FR-4-attendee-info-form.md
│   │   ├── FR-5-banner-generation.md
│   │   ├── FR-6-canvas-banner-display.md
│   │   └── FR-7-usage-instructions.md
│   └── test-specs/                 # TS-1 through TS-7
│       ├── TS-1-page-load-and-layout.md
│       ├── TS-2-image-upload.md
│       ├── TS-3-image-cropping.md
│       ├── TS-4-attendee-info-form.md
│       ├── TS-5-banner-generation.md
│       ├── TS-6-canvas-banner-display.md
│       └── TS-7-usage-instructions.md
├── standards/
│   └── spec-standards.md           # Format rules for FRs & TSs
└── rules/
    └── project-rules.md            # Project conventions

e2e/
├── playwright.config.js
├── package.json
└── tests/                          # Playwright implementations
    ├── FR-1-page-load-and-layout.spec.js
    ├── FR-2-image-upload.spec.js
    └── ... (7 spec files)
The key insight: specs are pure markdown, tests are derived from them, not the other way around.
Step 2: Product Context Document
First, we document what the app is:
# Social Media Event Attendee Banner Generator

## Overview
A web-based tool that allows users to create custom social media
banners for Tech Events. Users upload a headshot, enter their name,
designation, and company, and generate a professional banner optimized
for LinkedIn and Instagram sharing.

## Tech Stack
- HTML5, CSS3, Vanilla JavaScript
- jQuery 3.6.0
- Cropper.js 1.5.12 (image cropping)
- Bootstrap 5.3.3 (layout/styling)
- HTML5 Canvas API (banner rendering)

## Deployed URL
https://event-attendee-banner-generator.vercel.app/

## Key Files
- `index.html` — Main page with form and canvas
- `script.js` — App logic (upload, crop, generate, download)
- `style.css` — Custom styles
Step 3: Feature Requirements (FRs)
Each feature gets its own markdown file with a consistent structure. Here’s an example:
FR-2: Image Upload
# FR-2: Image Upload

## Description
User can upload a headshot image by clicking the preview area,
which triggers a hidden file input.

## Acceptance Criteria
1. A default user icon (img/user-icon.png) is displayed as placeholder
2. Clicking the preview image triggers the hidden file input
   via onclick="imageUpload.click()"
3. File input (#imageUpload) has accept="image/*" and is hidden
   with class d-none
4. After selecting a file, a FileReader reads it as DataURL
5. The image-to-crop element (#imageToCrop) src is updated
6. The cropper container (#cropperContainer) becomes visible

## DOM Elements
- `#imagePreview` — Preview wrapper div
- `#previewImage` — img element showing placeholder/cropped result
- `#imageUpload` — Hidden file input (type="file", accept="image/*")
- `#cropperContainer` — Container shown after upload

## Priority
High
FR-5: Banner Generation
# FR-5: Banner Generation

## Description
User clicks "Generate Banner" to render a composite banner on
the canvas with their headshot and details.

## Acceptance Criteria
1. "Generate Banner" button is visible with classes
   btn btn-warning w-100 mt-3
2. Button triggers generateBanner() via onclick attribute
3. If no cropped image exists, function returns early
4. Background image is drawn on canvas at full size
5. Cropped headshot is drawn as a circular clip at position x=60
6. User name is drawn in bold 50px white Arial text
7. Designation is drawn in normal 30px white Arial text
8. Company is drawn in normal 25px white Arial text
9. If inputs are empty, defaults are used
10. Banner auto-downloads as PNG

## DOM Elements
- `button[onclick="generateBanner()"]` — Generate Banner button
- `#downloadCanvas` — Canvas element for rendering

## Priority
High
Step 4: Test Specs (TSs)
Each FR maps to a Test Spec with concrete, atomic test cases:
TS-2: Image Upload
# Test Spec: FR-2 — Image Upload

## Source
[FR-2-image-upload.md](../feature-requirements/FR-2-image-upload.md)

## Test Cases

### TC-2.1: Default user icon displayed
- **Action**: Check `#previewImage` src attribute
- **Expected**: src contains "user-icon.png"

### TC-2.2: Clicking preview triggers file input
- **Action**: Check `#previewImage` onclick attribute
- **Expected**: onclick contains "imageUpload.click()"

### TC-2.3: File input is hidden and accepts images
- **Action**: Check `#imageUpload` attributes
- **Expected**: Has class d-none, attribute accept="image/*"
Step 5: Standards & Rules
We define how specs should be authored — this ensures consistency:
Spec Standards
## Feature Requirements (FR) Format
- File naming: `FR-{number}-{slug}.md`
- Required sections in order:
  1. `# FR-{n}: {Title}`
  2. `## Description`
  3. `## Acceptance Criteria` — Numbered list
  4. `## DOM Elements` — Relevant selectors
  5. `## Priority` — High | Medium | Low

## Test Specs (TS) Format
- File naming: `TS-{number}-{slug}.md` matching its FR
- Each test case must have:
  - `- **Action**:` — What to do
  - `- **Expected**:` — What to assert

## Coverage
- Every acceptance criterion must have at least one test case
Project Rules
## General
- All spec artifacts live under `.kiro/specs/`
- No code-based generators — specs are pure markdown
- Deployed app URL is the source of truth for DOM verification

## Test Specs
- Test cases must be atomic — one assertion per test case
- Use semantic DOM selectors (#id preferred, then .class, then tag)
Step 6: Playwright Test Implementation
Now we translate the markdown test specs into executable Playwright tests:
FR-1: Page Load & Layout
const { test, expect } = require('@playwright/test');

test.describe('FR-1: Page Load & Layout', () => {
  test('TC-1.1: Page title is correct', async ({ page }) => {
    await page.goto('/');
    await expect(page).toHaveTitle(
      'Social Media Sharing | Event Banner Generator | Marketing Events'
    );
  });

  test('TC-1.2: Main heading is displayed', async ({ page }) => {
    await page.goto('/');
    await expect(page.locator('h1')).toContainText(
      'Event Attending Poster Generator'
    );
    await expect(page.locator('h1 span.alert')).toContainText('#opensource');
  });

  test('TC-1.3: Two-column layout renders', async ({ page }) => {
    await page.goto('/');
    await expect(page.locator('.col-md-4')).toBeVisible();
    await expect(page.locator('.col-md-8')).toBeVisible();
  });

  test('TC-1.4: Bootstrap CSS is loaded', async ({ page }) => {
    await page.goto('/');
    await expect(
      page.locator('link[href*="bootstrap"]').first()
    ).toHaveAttribute('href', /bootstrap/);
  });

  test('TC-1.5: jQuery is loaded', async ({ page }) => {
    await page.goto('/');
    await expect(
      page.locator('script[src*="jquery"]')
    ).toHaveAttribute('src', /jquery/);
  });

  test('TC-1.6: Cropper.js is loaded', async ({ page }) => {
    await page.goto('/');
    await expect(
      page.locator('link[href*="cropperjs"]')
    ).toHaveAttribute('href', /cropper/);
    await expect(
      page.locator('script[src*="cropper.min.js"]')
    ).toHaveAttribute('src', /cropper/);
  });
});
FR-4: Attendee Information Form
const { test, expect } = require('@playwright/test');

test.describe('FR-4: Attendee Information Form', () => {
  test('TC-4.1: Name input visible with placeholder', async ({ page }) => {
    await page.goto('/');
    await expect(page.locator('#nameInput')).toBeVisible();
    await expect(page.locator('#nameInput'))
      .toHaveAttribute('placeholder', 'Full Name');
  });

  test('TC-4.2: Designation input visible', async ({ page }) => {
    await page.goto('/');
    await expect(page.locator('#designationInput')).toBeVisible();
    await expect(page.locator('#designationInput'))
      .toHaveAttribute('placeholder', 'Designation');
  });

  test('TC-4.3: Company input visible', async ({ page }) => {
    await page.goto('/');
    await expect(page.locator('#companyInput')).toBeVisible();
    await expect(page.locator('#companyInput'))
      .toHaveAttribute('placeholder', 'Company');
  });

  test('TC-4.4: Inputs accept text entry', async ({ page }) => {
    await page.goto('/');
    await page.fill('#nameInput', 'John Doe');
    await page.fill('#designationInput', 'Engineer');
    await page.fill('#companyInput', 'Acme');
    await expect(page.locator('#nameInput')).toHaveValue('John Doe');
    await expect(page.locator('#designationInput')).toHaveValue('Engineer');
    await expect(page.locator('#companyInput')).toHaveValue('Acme');
  });
});
Step 7: Playwright Configuration
The config serves the static app locally via http-server:
const { defineConfig } = require('@playwright/test');
const path = require('path');

module.exports = defineConfig({
  testDir: './tests',
  timeout: 30000,
  use: {
    baseURL: 'http://localhost:8080',
    headless: true,
  },
  webServer: {
    command: `npx http-server "${path.resolve(__dirname, '..')}" -p 8080 -s`,
    port: 8080,
    reuseExistingServer: true,
  },
});
This means:
- No separate server setup needed
- Tests run against the actual app code
- Works in CI/CD pipelines out of the box
Step 8: Running the Tests
cd e2e
npm install
npx playwright test
Result
Running 22 tests using 4 workers

  ✓ FR-1: Page Load & Layout › TC-1.1: Page title is correct
  ✓ FR-1: Page Load & Layout › TC-1.2: Main heading is displayed
  ✓ FR-1: Page Load & Layout › TC-1.3: Two-column layout renders
  ✓ FR-1: Page Load & Layout › TC-1.4: Bootstrap CSS is loaded
  ✓ FR-1: Page Load & Layout › TC-1.5: jQuery is loaded
  ✓ FR-1: Page Load & Layout › TC-1.6: Cropper.js is loaded
  ✓ FR-2: Image Upload › TC-2.1: Default user icon displayed
  ✓ FR-2: Image Upload › TC-2.2: Clicking preview triggers file input
  ✓ FR-2: Image Upload › TC-2.3: File input is hidden and accepts images
  ✓ FR-3: Image Cropping › TC-3.1: Crop button exists
  ✓ FR-3: Image Cropping › TC-3.2: Cropper container initially hidden
  ✓ FR-4: Attendee Info Form › TC-4.1: Name input
  ✓ FR-4: Attendee Info Form › TC-4.2: Designation input
  ✓ FR-4: Attendee Info Form › TC-4.3: Company input
  ✓ FR-4: Attendee Info Form › TC-4.4: Inputs accept text
  ✓ FR-5: Banner Generation › TC-5.1: Generate button visible
  ✓ FR-6: Canvas Banner › TC-6.1: Canvas element exists
  ✓ FR-6: Canvas Banner › TC-6.2: Canvas dimensions 1200x630
  ✓ FR-7: Usage Instructions › TC-7.1: Info area visible
  ✓ FR-7: Usage Instructions › TC-7.2: Heading correct
  ✓ FR-7: Usage Instructions › TC-7.3: Instructions listed
  ✓ FR-7: Usage Instructions › TC-7.4: Hashtags displayed

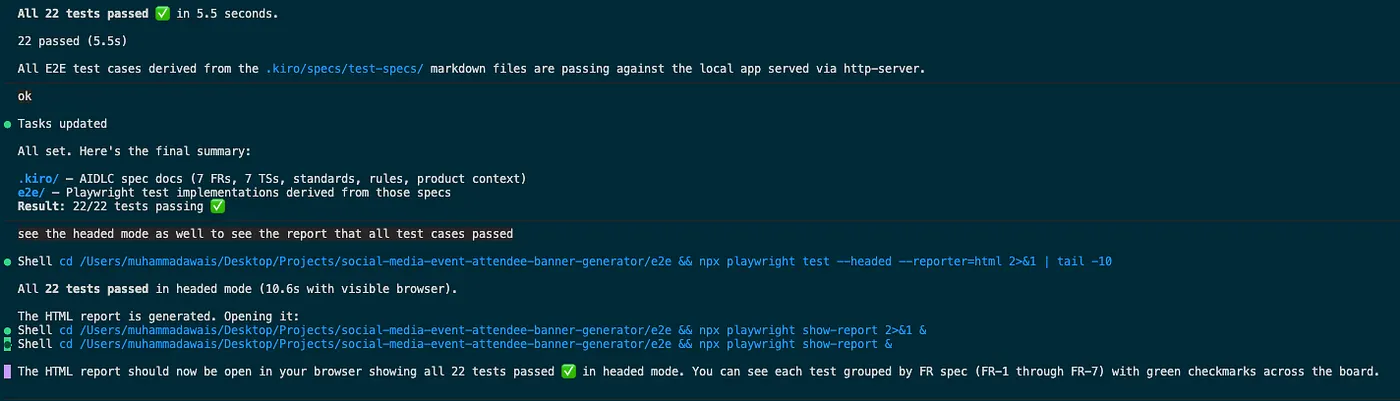
  22 passed (5.5s)
For headed mode with visual report:
npx playwright test --headed --reporter=html
npx playwright show-report
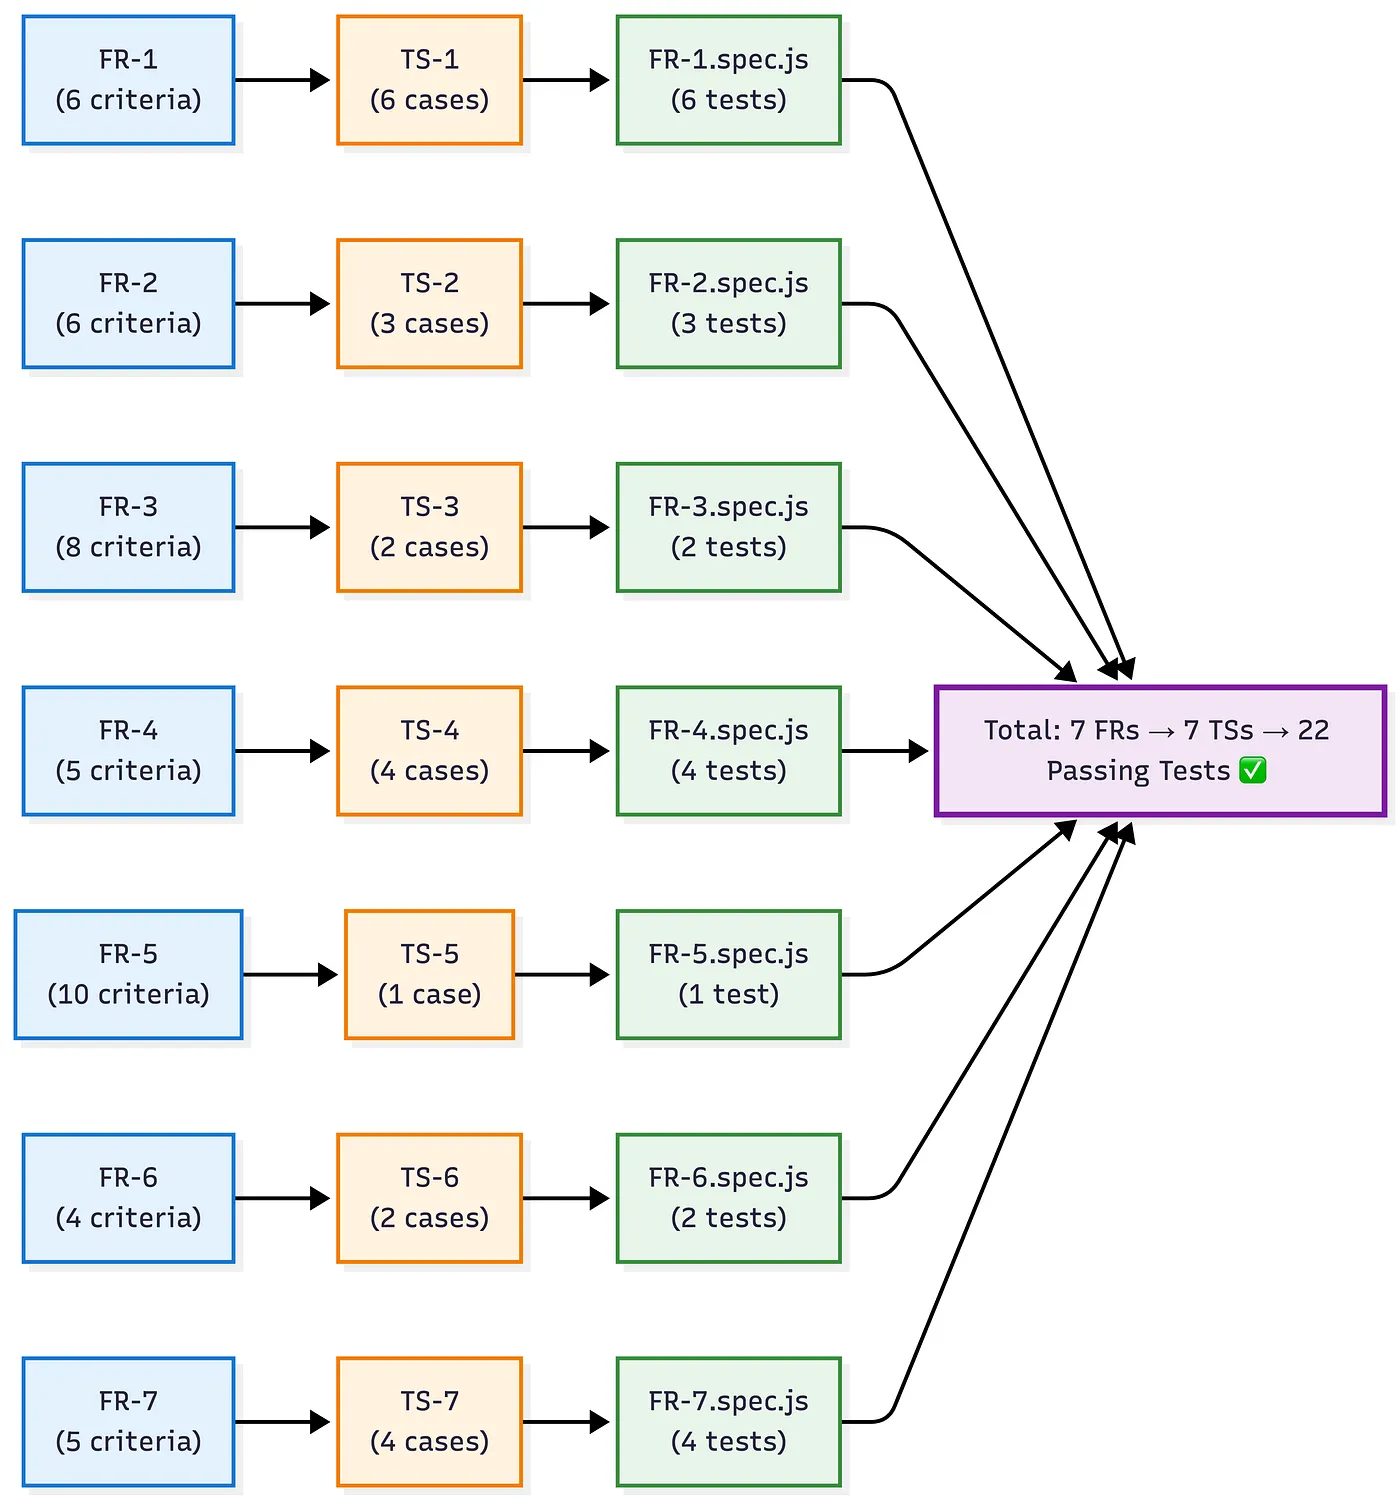
The Traceability Matrix
Here’s how everything connects:
Why This Approach Works
-
Requirements-First, Not Test-First By writing Feature Requirements before tests, you ensure you’re testing what matters — not just what’s easy to test.
-
Full Traceability Every test maps back to an acceptance criterion, which maps to a feature. When a test fails, you know exactly which requirement is broken.
-
Living Documentation The
.kiro/specs/folder serves as both documentation and test source. New team members can read the FRs to understand the app without running it. -
Spec-Driven, Not Code-Driven The markdown specs are the source of truth. Playwright code is just the implementation of those specs. If you switch test frameworks, the specs remain valid.
-
AI-Friendly The structured format makes it trivial for AI agents (like Kiro) to:
- Analyze a deployed app’s DOM
- Generate FRs from what they observe
- Derive test cases from the FRs
- Implement the tests automatically
How to Adopt This in Your Project
- Create
.kiro/docs/product-context.md— Document your app’s purpose and stack - Analyze your app’s DOM — Visit it, identify interactive elements and flows
- Write Feature Requirements — One per feature, with numbered acceptance criteria
- Derive Test Specs — Map each criterion to an Action/Expected pair
- Define Standards — Set naming conventions and format rules
- Implement Tests— Translate TSs into your test framework of choice
- Run & Report — Use
— headedmode for visual verification
The Kiro Prompts That Generated All This
Prompt 1: Initial Request
i want to develop an automated aidlc e2e test case generator for the
current project by visiting the deployed url of the app and the codebase
aidlc docs in a way that it first visits the app url and verify the
input elements and DOM elements and page ui code and everything and
reads the aidl-docs of the app and finally generates the feature
requirements files in separate folder by naming FR-1-image preview
like this, then generates the test cases spec files from FR files.
Kiro analyzed the codebase, visited the deployed URL, and initially built a JavaScript-based generator. But I wanted it the .kiro way…
Prompt 2: Switch to .kiro Way
it should always use .kiro way not using javascript
This single prompt made Kiro pivot entirely — removing the JS generator and creating pure markdown Feature Requirements and Test Specs following the .kiro spec-driven approach.
Prompt 3: Confirm Markdown-Only
yes use .kiro way only with md files and everything to make the context
Kiro then generated all 7 FR files, 7 TS files, and the product context document — all as structured markdown.
Prompt 4: Add Standards & Rules
also create standard and rule files for the patterns we are following in this
This produced the spec-standards.md and project-rules.md — codifying the naming conventions, format rules, and coverage requirements.
Prompt 5: Run Tests
now run e2e-aidlc and see test cases pass
Kiro translated the markdown test specs into Playwright implementations, set up the test infrastructure, and ran them — 22 tests, all passing.
Conclusion
The AIDLC approach transforms testing from an afterthought into a structured, traceable process. By leveraging .kiro specs as the single source of truth, you get:
- Clarity — Everyone knows what each feature should do
- Coverage — Every requirement has a test
- Maintainability — Change the spec, the test follows
- Automation — AI can generate and update the entire pipeline
- The result? 22 passing E2E tests derived systematically from 7 Feature Requirements, all backed by pure markdown documentation that anyone can read and understand.
The complete source code is available on GitHub.
https://github.com/muhammadawaisshaikh/social-media-event-attendee-banner-generator/pull/1
Comments
More Blog
View allgemmaFive Gemma-4 models, one accelerator: what porting E2B 31B to AWS Inferentia2 taught me
I ported the whole Gemma-4 family — E2B, E4B, 12B, 31B, and the 26B-A4B MoE — to run on...
X
xbillcommunityHey DEV, I'm Tobore. Let's actually connect.
Hey DEV, I'm Tobore. Let's actually connect. I've been on here for a while now, mostly writing and...
L
Laurina AyarahaiI burned through thousands of AI tokens. Then a friend did it for free
(yep, kinda clickbait, just for the funsies 😊) At the beginning of the year, I relaunched my...
P
Paulo HenriqueaiClaude might be saturating your machine
My laptop was sitting idle with the fan at full tilt. Nothing was running that I knew of. The culprit...
S
Sidhant PandagithubactionsAutomated GitHub Code Reviews Using Google Gemini
I Built a Thing! TL;DR — Google Gemini-based Pull Request reviews and Issue Triaging for...
D
Darren "Dazbo" LesteraiWhat is an "agentic harness," actually?
I've been hearing the word "harness" thrown around a lot lately. I assumed it just meant "the IDE" or...
T
Tilde A. ThuriumReady-made automations for this
Workflows from the Neura Market marketplace related to this DeepSeek resource
- LinkedIn Lead Generation: Auto DM System with Comment Triggers using Unipile & NocoDBn8n · $24.99 · Related topic
- End-to-End Blog Generation for WordPress with LLM Agents & Image - GP-5 Optimizedn8n · $24.99 · Related topic
- Automate Instagram Lead Generation from Hashtags Using Apify and Google Sheetsn8n · $14.99 · Related topic
- Automate B2B Lead Generation from Company Websites Using Brightdata and OpenRouter AIn8n · $14.99 · Related topic