
Back to Blog githubcopilot
 cursor
 ai
ai amazonbedrock
 ai
ai ai
ai mcp
mcp
Free, Self-Hosted & Private Copilot to Streamline Coding
Berk August 31, 2024
0 views
Overview In today's fast-paced development landscape, having a reliable and efficient...
Overview
In today's fast-paced development landscape, having a reliable and efficient copilot by your side can be a game-changer. However, relying on cloud-based services often comes with concerns over data privacy and security. This is where self-hosted LLMs come into play, offering a cutting-edge solution that empowers developers to tailor their functionalities while keeping sensitive information within their control.
The Advantages of Self-Hosted LLMs
Self-hosted LLMs provide unparalleled advantages over their hosted counterparts. By hosting the model on your machine, you gain greater control over customization, enabling you to tailor functionalities to your specific needs. Moreover, self-hosted solutions ensure data privacy and security, as sensitive information remains within the confines of your infrastructure.
Imagine having a Copilot or Cursor alternative that is both free and private, seamlessly integrating with your development environment to offer real-time code suggestions, completions, and reviews. This self-hosted copilot leverages powerful language models to provide intelligent coding assistance while ensuring your data remains secure and under your control. A free self-hosted copilot eliminates the need for expensive subscriptions or licensing fees associated with hosted solutions.
Getting Started with Ollama
In this article, we will explore how to use a cutting-edge LLM hosted on your machine to connect it to VSCode for a powerful free self-hosted Copilot or Cursor experience without sharing any information with third-party services. We will utilize the Ollama server, which has been previously deployed in our previous blog post. If you don't have Ollama or another OpenAI API-compatible LLM, you can follow the instructions outlined in that article to deploy and configure your own instance.
Pre-requirements
Before we dive into the installation process, ensure that you meet the following pre-requisites:
- VSCode installed on your machine.
- Network access to the Ollama server. If you are running the Ollama on another machine, you should be able to connect to the Ollama server port.
- If you want to test if you can connect to the Ollama server on another machine, you can use the following command:
$ curl http://192.168.1.100:11434
Ollama is running
- If you want to test if you can connect to the Ollama server on the local machine, you can use the following command:
$ curl http://127.0.0.1:11434
Ollama is running
- If you don't have Ollama installed, check the previous blog.
Installing the Continue plugin
To integrate your LLM with VSCode, begin by installing the Continue extension that enable copilot functionalities.
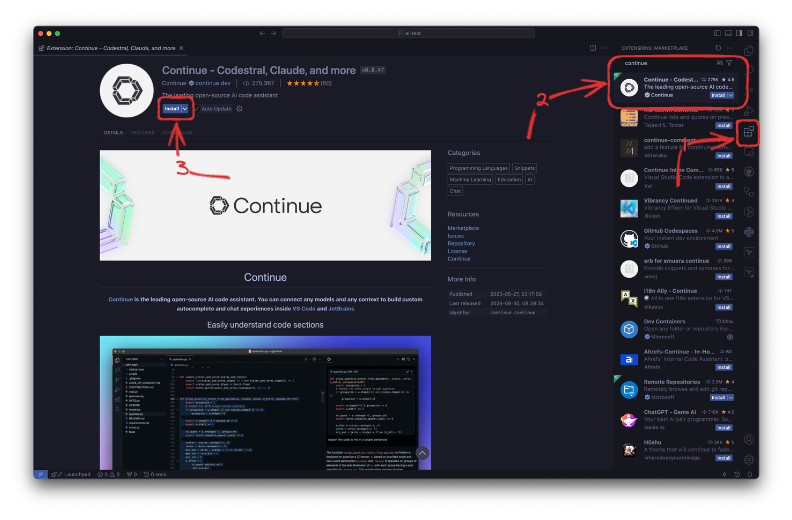
Configure the Continue Plugin
In MacOS and Linux, you can find the configuration file in ~/.continue/config.json. In Windows, it is in %userprofile%\.continue/config.json.
Edit the file with a text editor. Here I will show to edit with vim.
vim ~/.continue/config.json
In the models list, add the models that installed on the Ollama server you want to use in the VSCode. In the example below, I will define two LLMs installed my Ollama server which is deepseek-coder and llama3.1.
{
  "models": [
    {
      "title": "Llama 3",
      "provider": "ollama",
      "model": "llama3"
    },
    {
      "title": "Ollama",
      "provider": "ollama",
      "model": "AUTODETECT"
    },
    {
      "title": "Local Ollama DeepSeek-Coder 6.7b",
      "provider": "ollama",
      "model": "deepseek-coder:6.7b-instruct-q8_0",
      "apiBase": "http://192.168.1.100:11434"
    },
    {
      "title": "Local Ollama LLama3.1",
      "provider": "ollama",
      "model": "llama3.1:8b-instruct-q8_0",
      "apiBase": "http://192.168.1.100:11434"
    }
  ],
...
}
Save and exit the file. If you use the vim command to edit the file, hit ESC, then type :wq! and hit enter.
Test the Ollama LLMs on VSCode with Continue
Open the VSCode window and Continue extension chat menu.
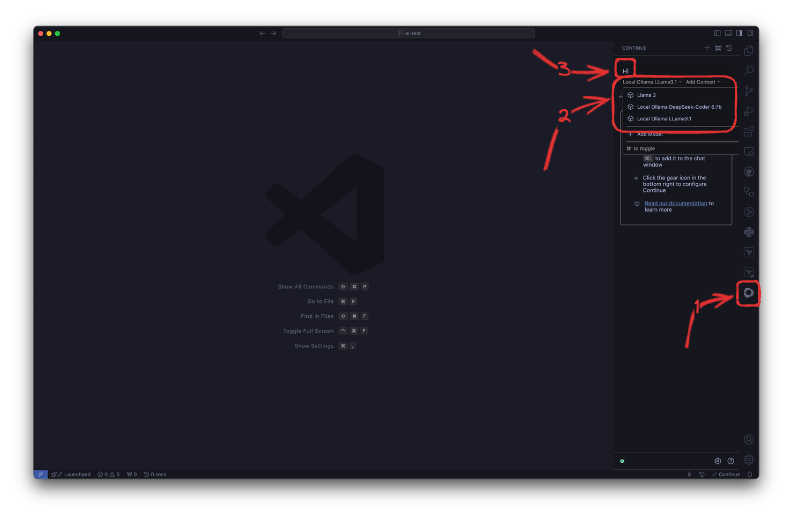
Check if the LLMs exists that you have configured in the previous step. Send a test message like "hi" and check if you can get response from the Ollama server.
You can use that menu to chat with the Ollama server without needing a web UI.
Using Continue as Copilot Alternative
To use Ollama and Continue as a Copilot alternative, we will create a Golang CLI app.
Lets create a Go application in an empty directory.
mkdir aitest
cd aitest
Open the directory with the VSCode.
code .
Create a file named main.go.
Hit command (ctrl on Windows/Linux) + I to open the Continue context menu.
Copy the prompt below and give it to Continue to ask for the application codes.
Create a command-line interface (CLI) application that meets the following requirements: The application should display its version, provide a help message, and include usage examples. The CLI should accept one positional argument, which will be a number. Upon execution, the application should print numbers from 0 up to the provided number. Additionally, while printing each number, the application should display a progress bar indicating the percentage of completion. The progress bar should use the symbol "#" to represent the progress and also display the percentage as a number. The application should wait 3 milliseconds before printing each number to simulate the progress. The output should always be on one line, and each new log should overwrite the previous one. Do not use any external libraries for this task.
You can see the performance and quality of the code from the video below:
<video width="720" height="480" controls> <source src="https://cdn.jsdelivr.net/gh/burakberkkeskin/blog-cdn/self-hosted-free-copilot-with-ollama-and-vscode/images/4-overview-video-v5.mp4" type="video/mp4"> </video>Comments
More Blog
View allcursorCursor Automations in 2026: wire event-triggered coding agents to Slack, CI, and timers
Cursor Automations in 2026: wire event-triggered coding agents to Slack, CI, and...
M
Manu ShuklaaiIndex Everything, or Read Everything? The Dilemma of Feeding Specs to AI in Multi-Repo Development
The specs exist. The AI just can't see them. I've always been the type who builds hobby...
S
Shunya ShidaamazonbedrockConnect Claude Code, Cursor and Codex to Amazon Bedrock's new console (2026)
Connect Claude Code, Cursor and Codex to Amazon Bedrock's new console (2026) Summary. On 5...
M
Manu ShuklaaiSpotting AI UI is too easy
There is a weird uncanny valley with LLM-generated UI right now. The code functions perfectly, but if...
H
Harish .saiSeven ranking frameworks, one search page, zero translation tables
I went down a rabbit hole this morning reading the late-2025 Juejin AI roundups side by side, and the...
N
ninghonggangmcpZendesk MCP: Let Claude Handle Your Support Tickets
Install guide and config at curatedmcp.com Zendesk MCP: Let Claude Handle Your Support...
C
curatedmcpReady-made automations for this
Workflows from the Neura Market marketplace related to this Cursor resource
- Message Buffer System with Redis for Efficient Processingn8n · $14.99 · Related topic
- Streamline Multi-Level Document Approvals with Supabase and Gmailn8n · $24.99 · Related topic
- Streamline Client Onboarding with Automated Typeform to Google Drive and AI Researchn8n · $24.99 · Related topic
- Build a Modular Slackbot with n8n for Efficient Command Managementn8n · $19.99 · Related topic